“has it ever been repainted?”
This is probably the number one question I received and asked in the collector car business. To those in the know … the answer to this question can make or break a sale. I’ve already explained the true value of original paint and how it can greatly affect a car’s value. But having the “eye” of seeing past the seller’s “all original paint” claims is a skillset that took me years out in the field to obtain, which included working alongside a licensed concours judge, inspecting hundreds of cars (both classic and modern), and even time spent working at a body shop in my early years.
This is the most in depth article I have written, so get comfortable! I pour everything I’ve learned into this page, with pictures of actual cars that I’ve inspected while in the field. My approach toward paint inspection involves focusing in on my “hot spots” – these are the common areas on a car known for exposing even the most “undetectable” repairs, most of which you’d normally miss.
The best part? I rarely ever had to use a paint thickness gauge.
Is a paint thickness gauge a useful tool? Yes (here is how to use it properly). Is it required for spotting paintwork? Absolutely not, and this guide will explain why.
HOW TO INSPECT FOR PAINTWORK
the most comprehensive guide on verifying original paint!
Note: The information in this article only applies to metal bodied vehicles. Fiberglass cars, such as Corvettes, are assembled much differently than traditional metal bodied vehicles. What would be considered paintwork evidence/tampering on a metal bodied car may actually be factory original on a fiberglass car. With too many unique examples to list, fiberglass cars such as Corvettes are excluded from this article.
There are three tips that will allow you to spot 80% of aftermarket paintwork out there:
1. Know how cars are painted from the factory. This is the single most important bit of knowledge you need to possess when authenticating a car’s paint job. Cars are uniformly painted at the factory as a bare shell. Everything from trim, glass, suspension components, gas tank, and weatherstripping is added after the fact. So if you see paint on it (including the hardware that holds it), this means paintwork was done in this area.
2. Know what a perfect example looks like. Recognizing a bad car becomes incredibly easy when you know what a perfect one looks like. Search the classifieds for ultra low mileage examples of the car you are planning to buy and study the close-up photos carefully (these pristine examples usually have detailed, lengthy ads with lots of close ups). If the car is nearby, inspect it in person and shoot detailed pictures of the door sills, the panel gaps, exterior trim pieces, VIN stickers, miscellaneous hardware inside the door frame, etc. Take note of what parts are painted and what parts aren’t. The more “perfect’ cars you dissect, the more you are able to spot incorrect details on other vehicles. This may be time consuming, but if you’re investing a large chunk of money on the car of your dreams, this knowledge becomes invaluable.
3. Always look at the opposite side of the car for comparison. This seems so basic, but this trick is a quick way to spot paintwork. From the factory, both sides will look exactly alike – if an area (or object) is unpainted on one side, it will be unpainted on the other. Some body shops skimp on the details, so when in doubt, walk around the car for a comparison. Too many times I see a piece of unpainted hardware on one side, yet the other side shows it painted.
These three tips alone have allowed me to expose countless repainted vehicles in the car business, but knowing the common (and uncommon) hot spots of tape lines and overspray are crucial before you can become confident inspecting any car:
VISUAL INDICATORS
In this section, we will be referring to the following cars quite often for close-ups. As beautiful as the Camaro appears to be, it was chosen because the evidence of a repaint is, honestly … overwhelming. This car had a lacquer re-spray in the 80’s, and while it seems downright obvious in the photos, and it happens to expose itself in places that are notorious for giving away even the highest quality resprays. On the other hand, the Jaguar requires a more careful eye, and is a more realistic example of what you can easily miss during inspection.

1998 Jaguar XJ8-L

1969 Camaro Z28
Before we get started, we must expose a sad truth. While using these techniques out in the field, you may come across a car who’s original owner claims that no paintwork has ever been done (despite your findings). They’ll say “I bought it brand new, owned it for 10 years, and not once have I needed to do any paint repair!” They may be telling the truth, but the unfortunate reality is that new cars occasionally see paintwork before they’re sold new off the lot, due to damage during transport, mishaps at the dealership, and more. Regardless, paintwork is paintwork, and it affects the value of the car.
Also, as a warning … don’t go around jumping to conclusions on people’s cars just because you found ONE of these indicators. Some indicators are more like “red flags” and require further evidence to be conclusive. For example, I had a buyer who assumed our 2002 Camaro SS with 10k original miles was completely repainted simply because he saw (what he thought was) an unusual amount of orange peel throughout the surface. “You can just tell, look!“, he said, despite the fact that it showed zero signs of repaint throughout the entire car. The original owner, who knew it was all original, was very insulted. After bringing in a second expert opinion to confirm that this was indeed the original paint (with factory orange peel), the buyer got quiet. A car that has truly been repainted will show several clues, and the techniques below will help you find almost all of them in a matter of seconds.
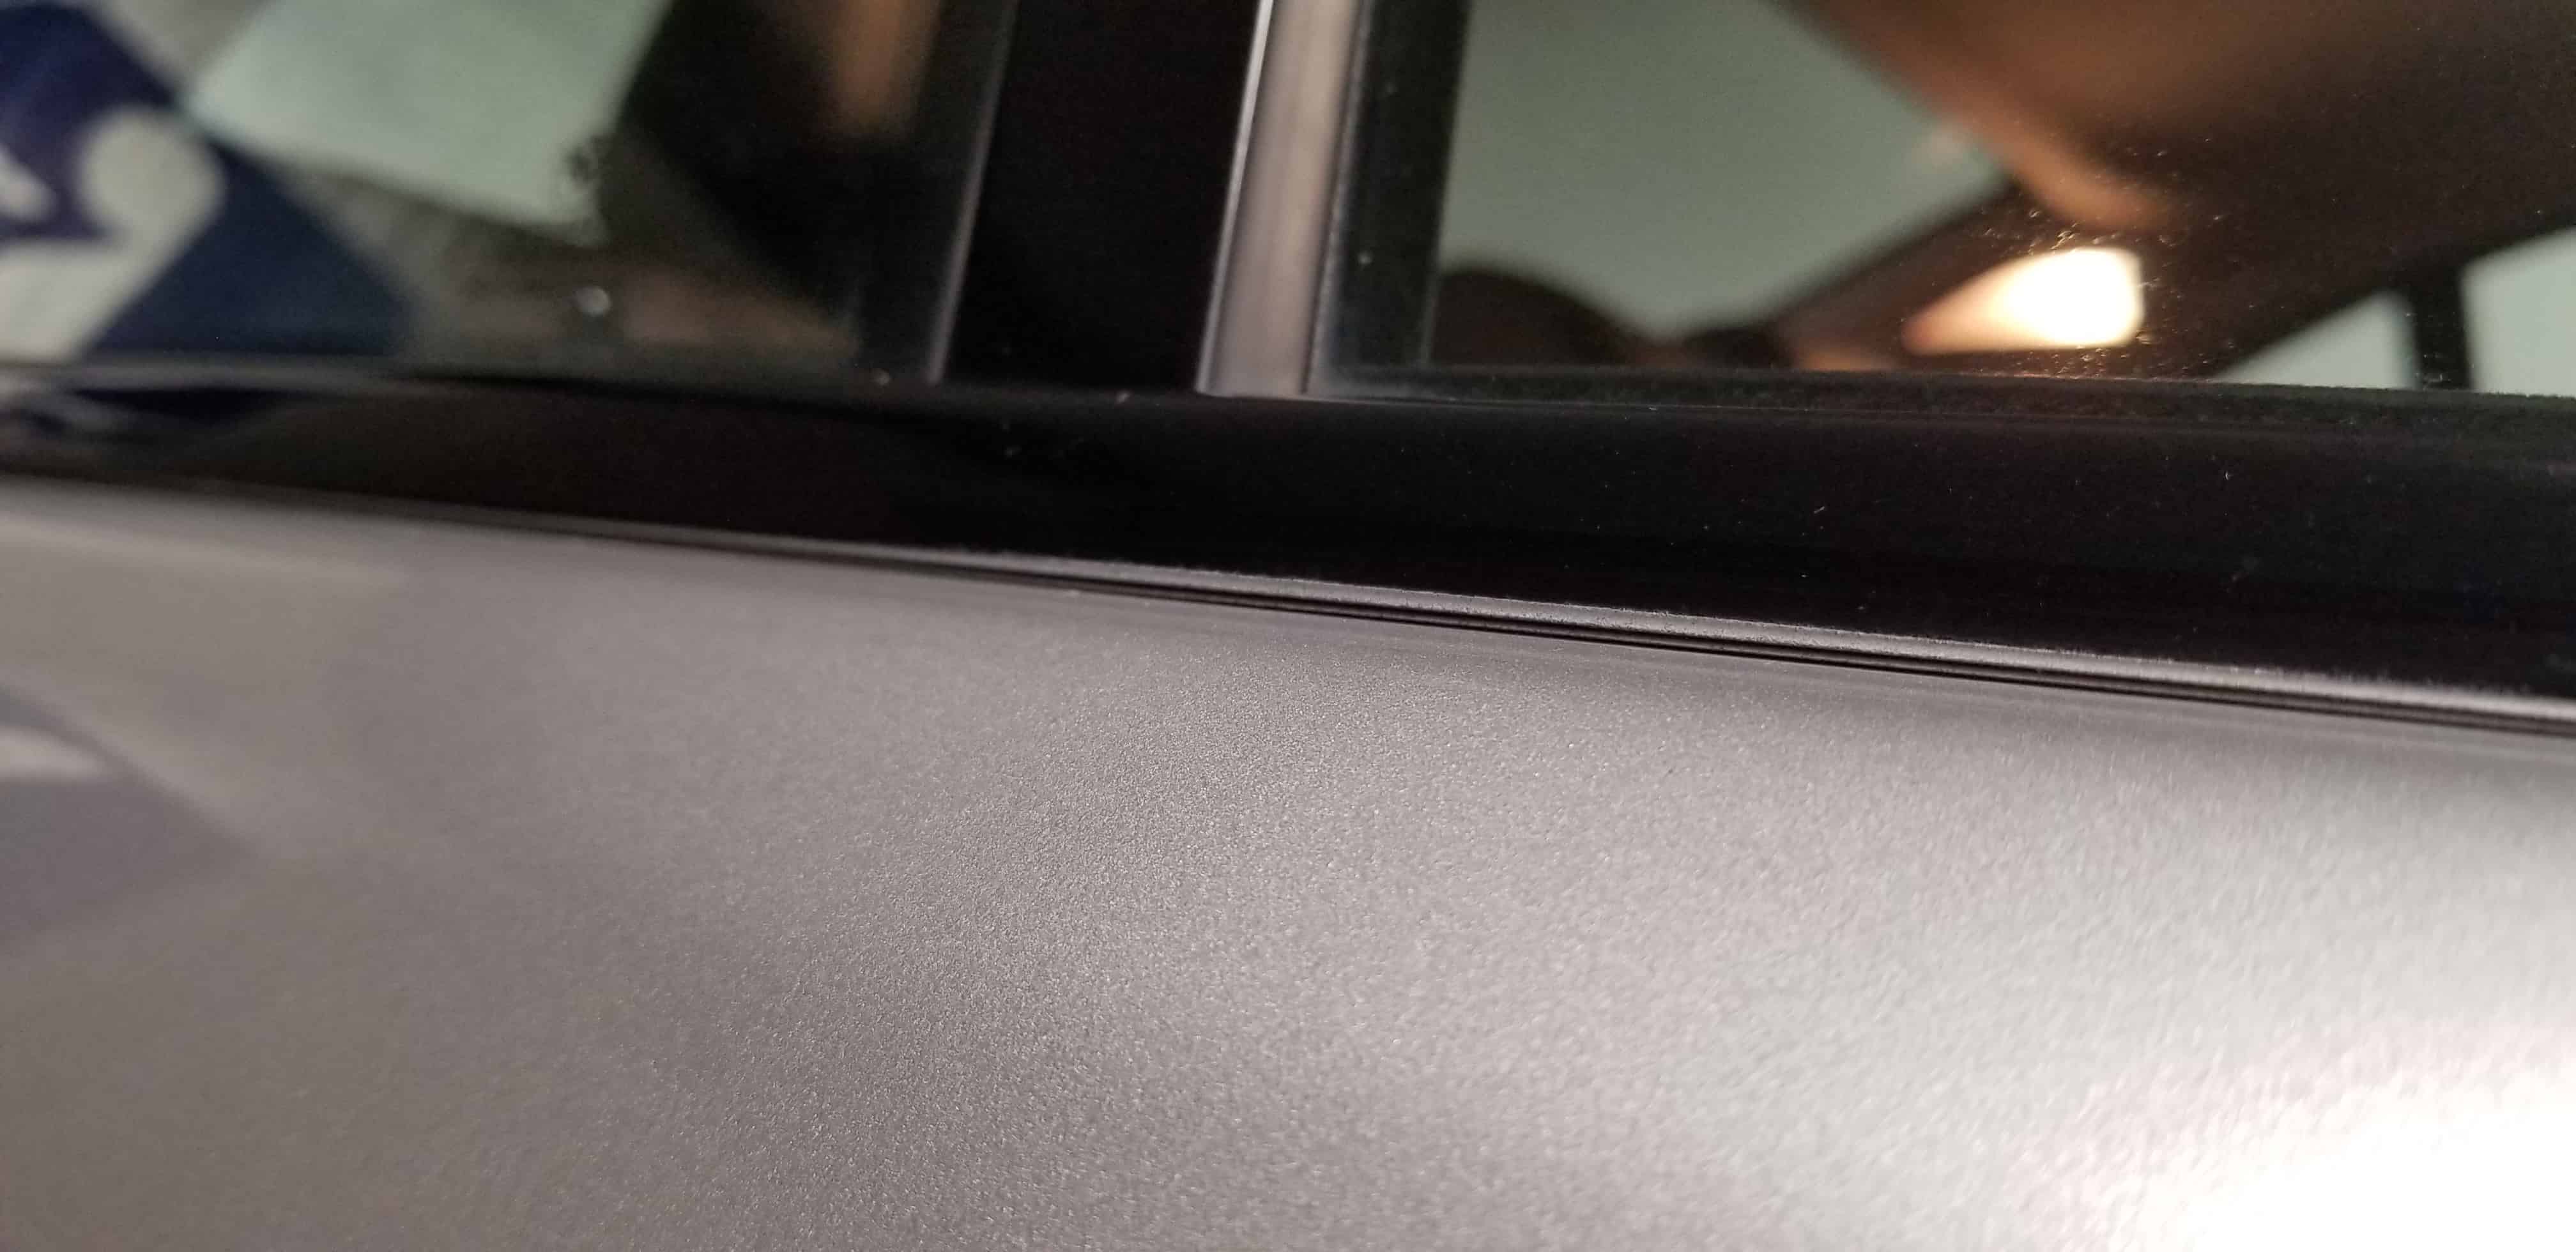
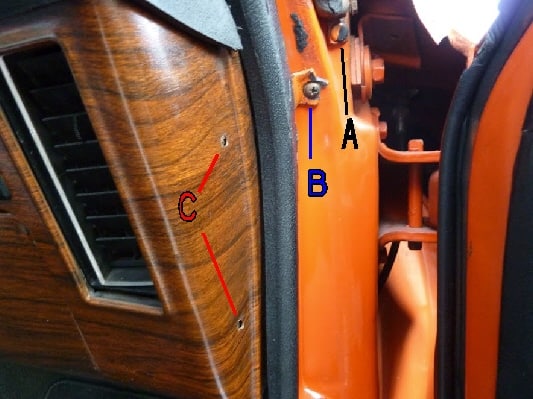
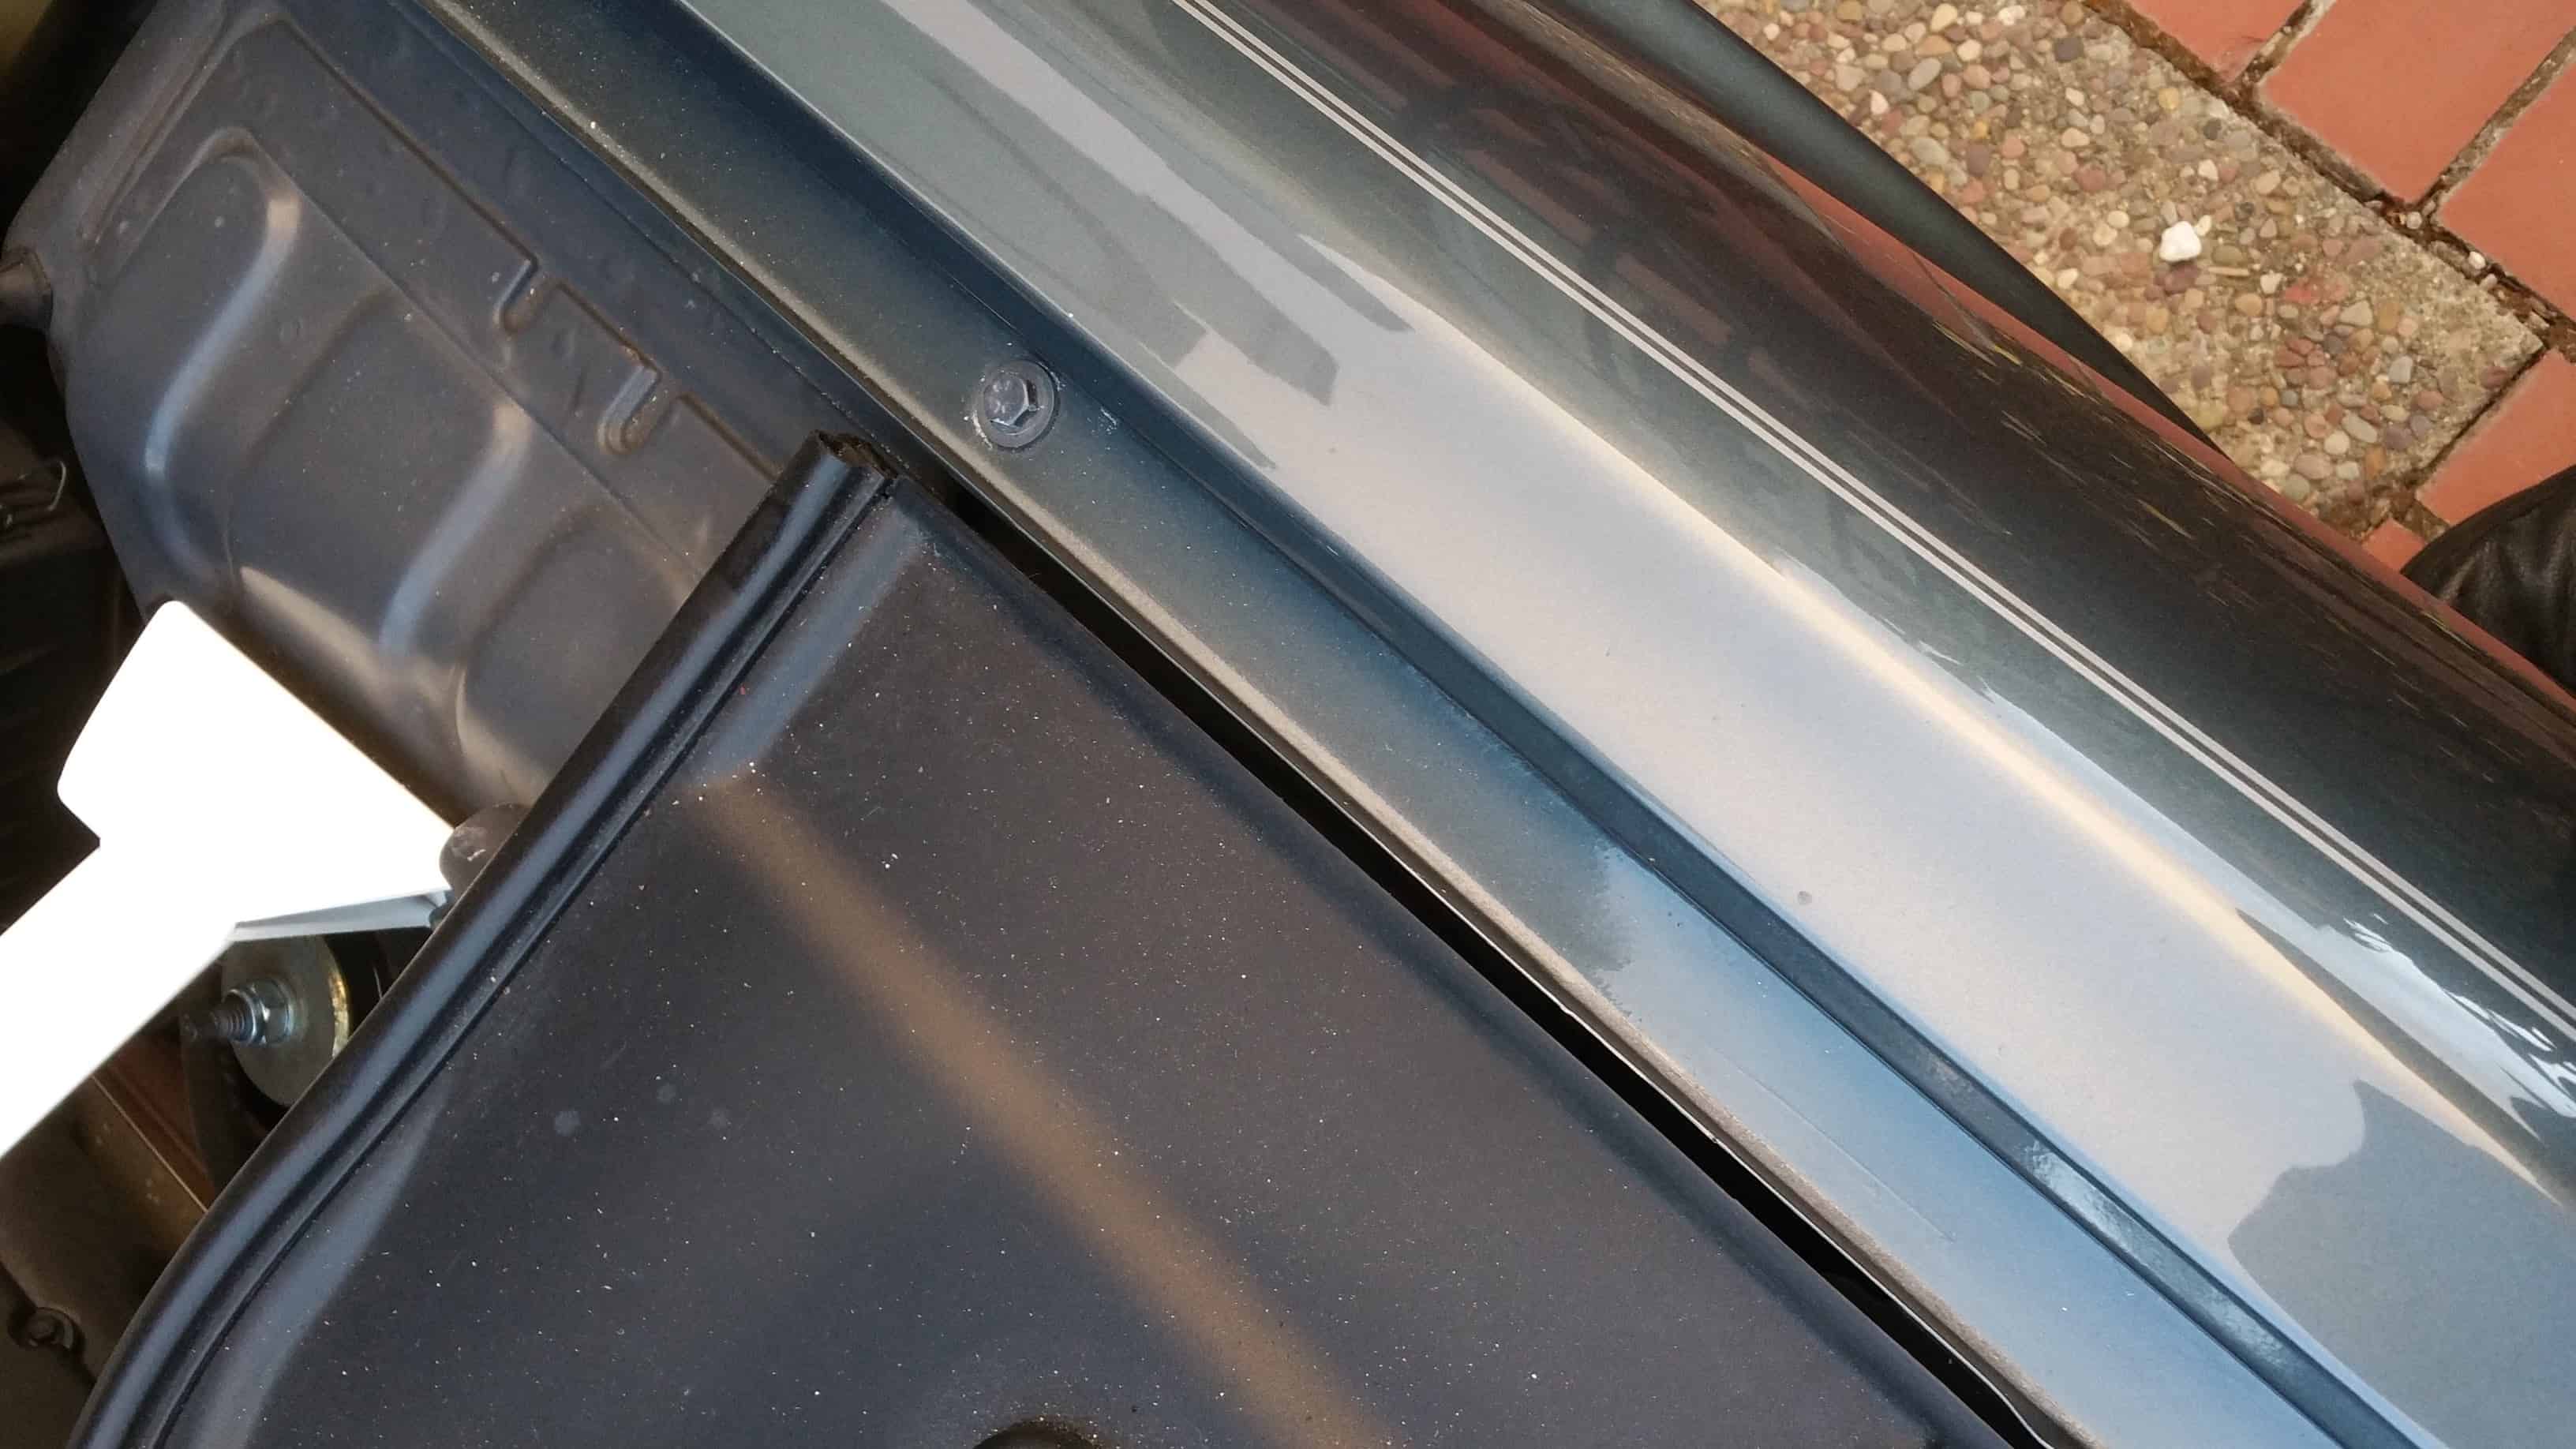
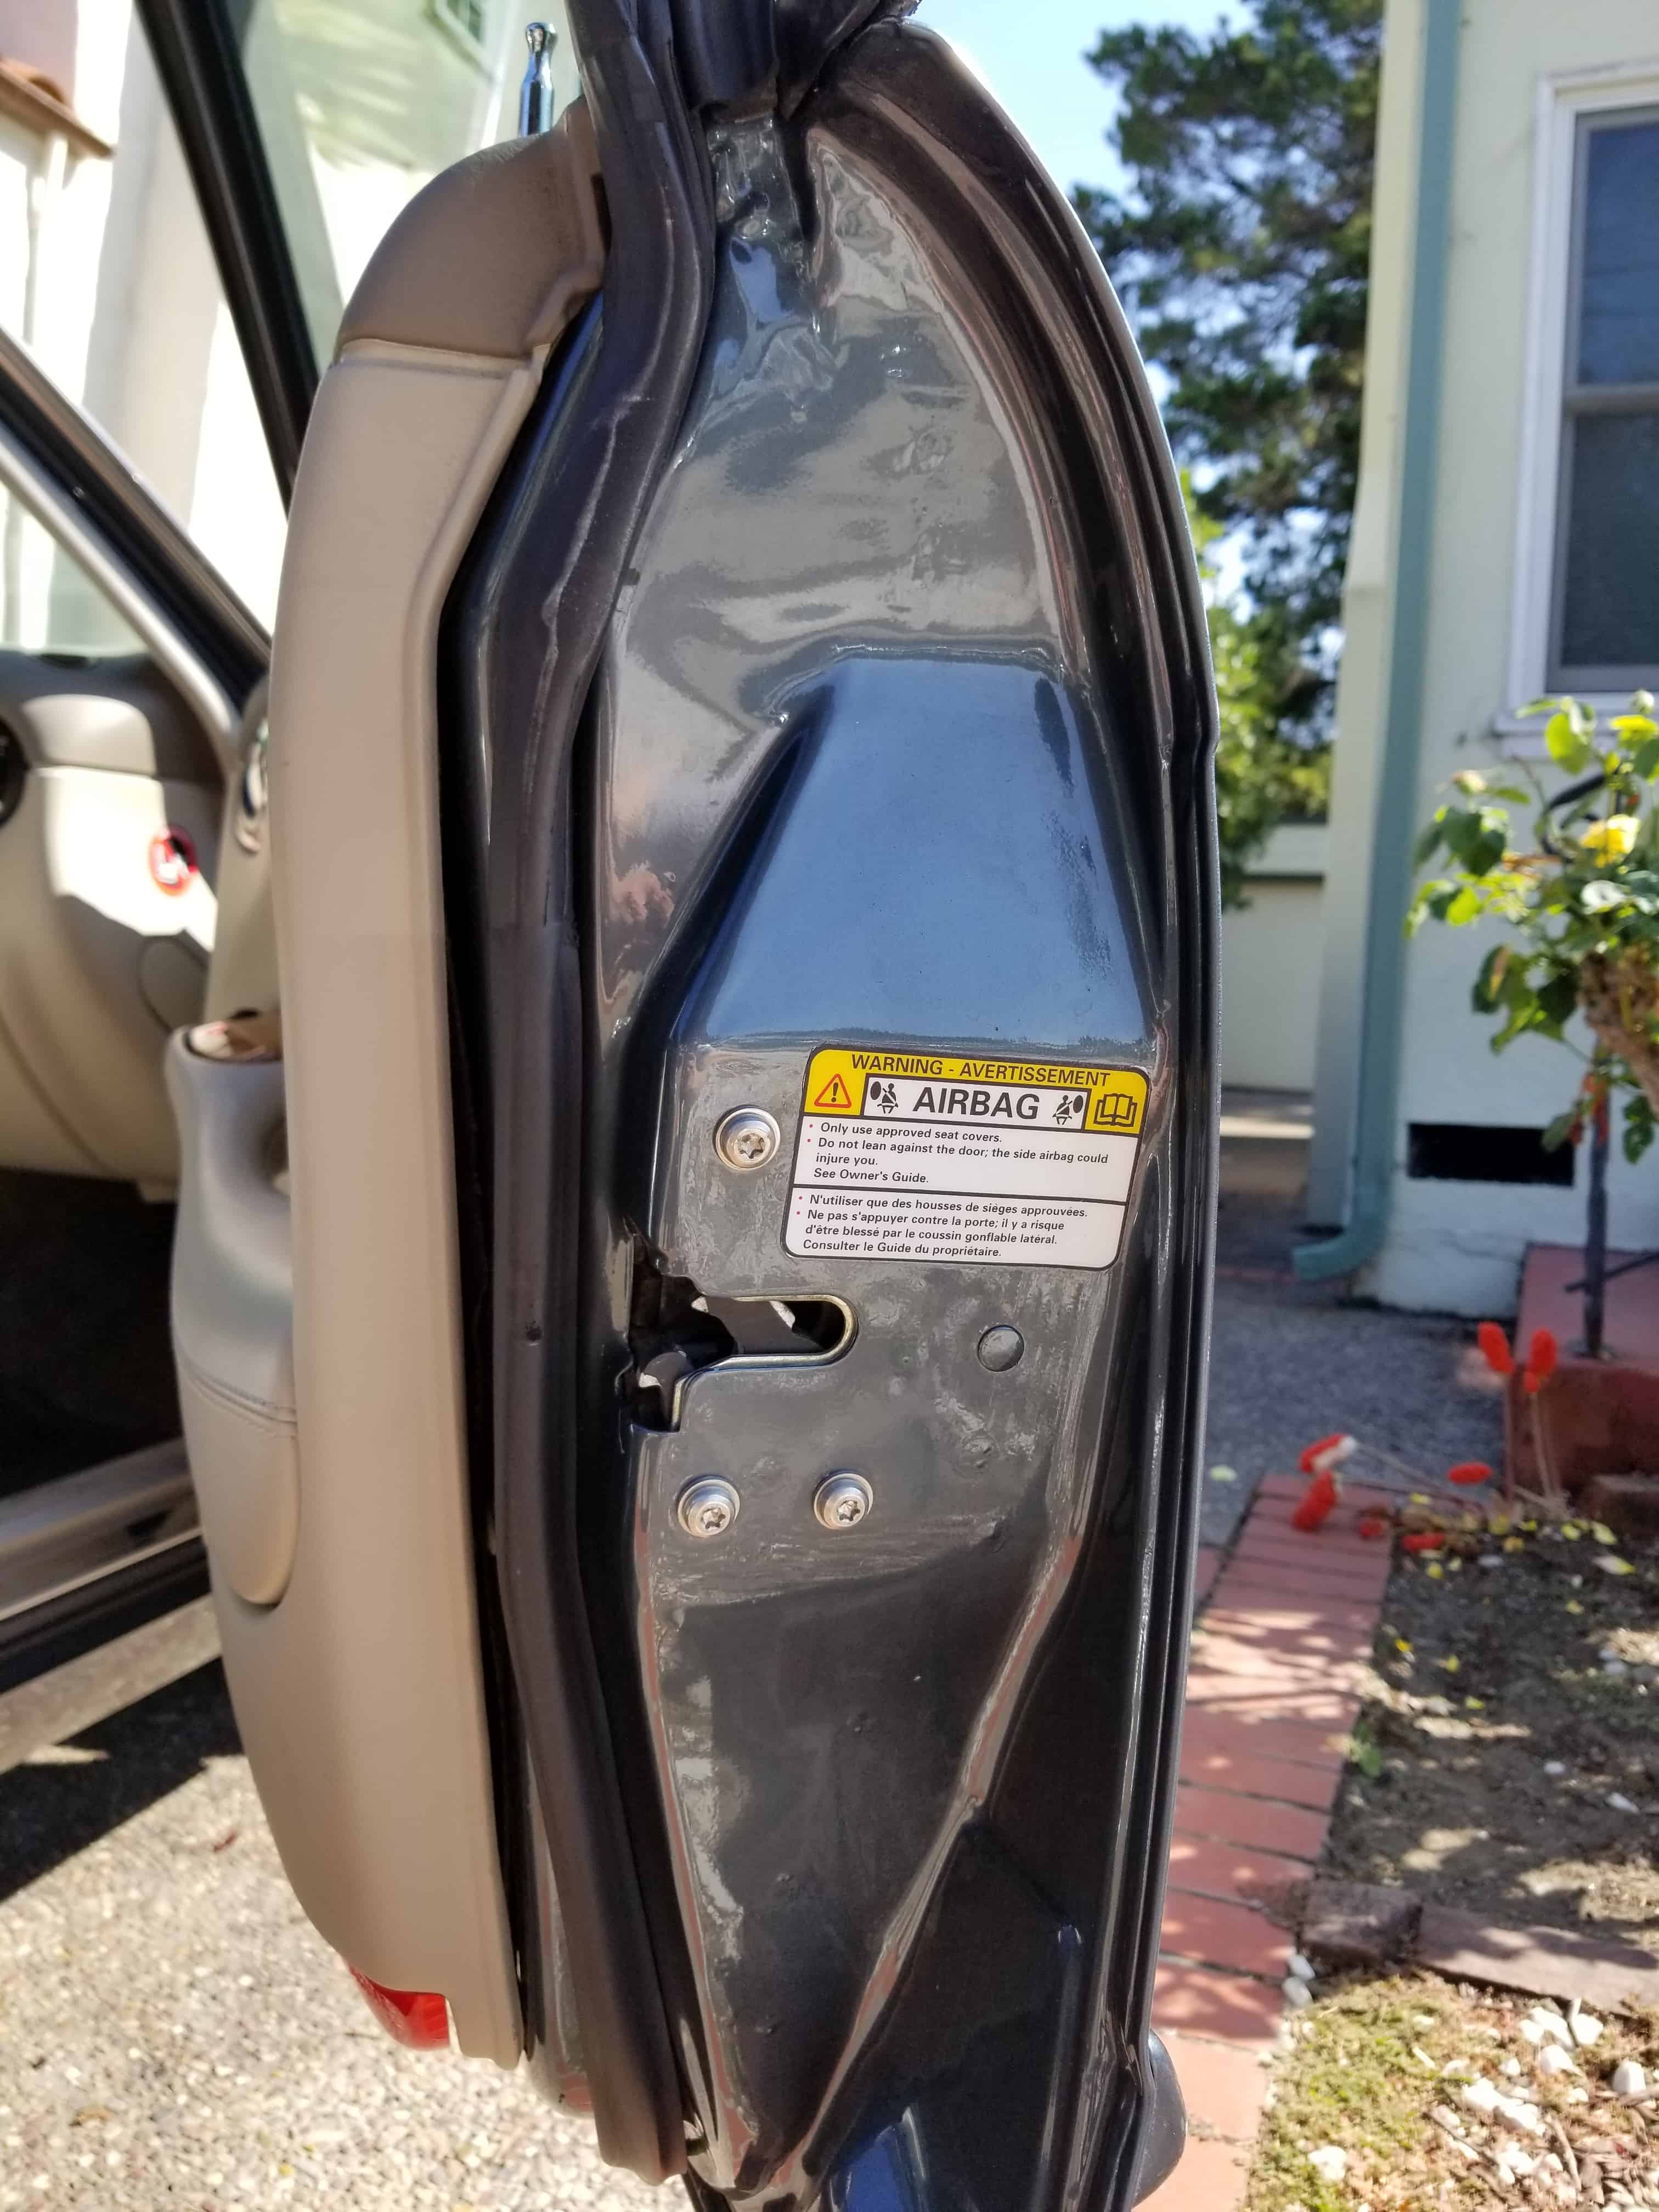
DOOR PILLAR, JAMBS AND SILLS
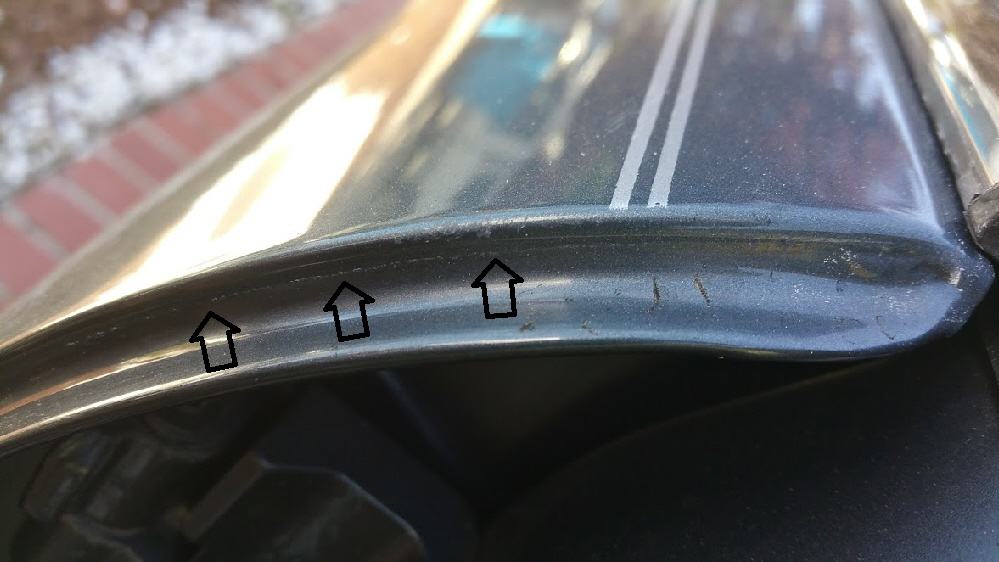
This entire area, combined with the door hinge area, can expose more signs of prior paintwork than any other location on a car. The first thing to do is inspect the door jamb edge for a tape line (a raised edge of new paint over the old paint). The line comes from the tape used to mask the area not being painted.
A perfect example of tape line on a painted door is found on the Jaguar below. Zooming in, you can see the tape line along the entire edge of the door, confirming the door was painted:
RELAX … ITS JUST WAX! – During close inspection, you may come across a faint white line along the edges of areas like the door frame, door jamb, fuel filler cap, and where the door meets the window seal/trim. It will look similar, if not exactly, like the tape line in the Jaguar pictures above. However, always make sure to rub it with your thumb, because while it looks like a tape edge, it’s sometimes just leftover wax residue from a recent detail job (and it will rub right off).

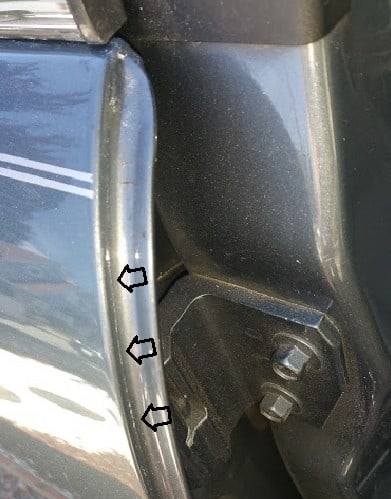
However, when you zoom in below … (tap images)
You’ll notice a faint line of silver overspray (again, be sure to rub it with your thumb to verify it isn’t wax or polish). Since the suspect panel is the rear door, opening the front door can reveal more evidence. The edge of the tape was either not secure or didn’t wrap around far enough, and overspray snuck through. This door has indeed been painted.
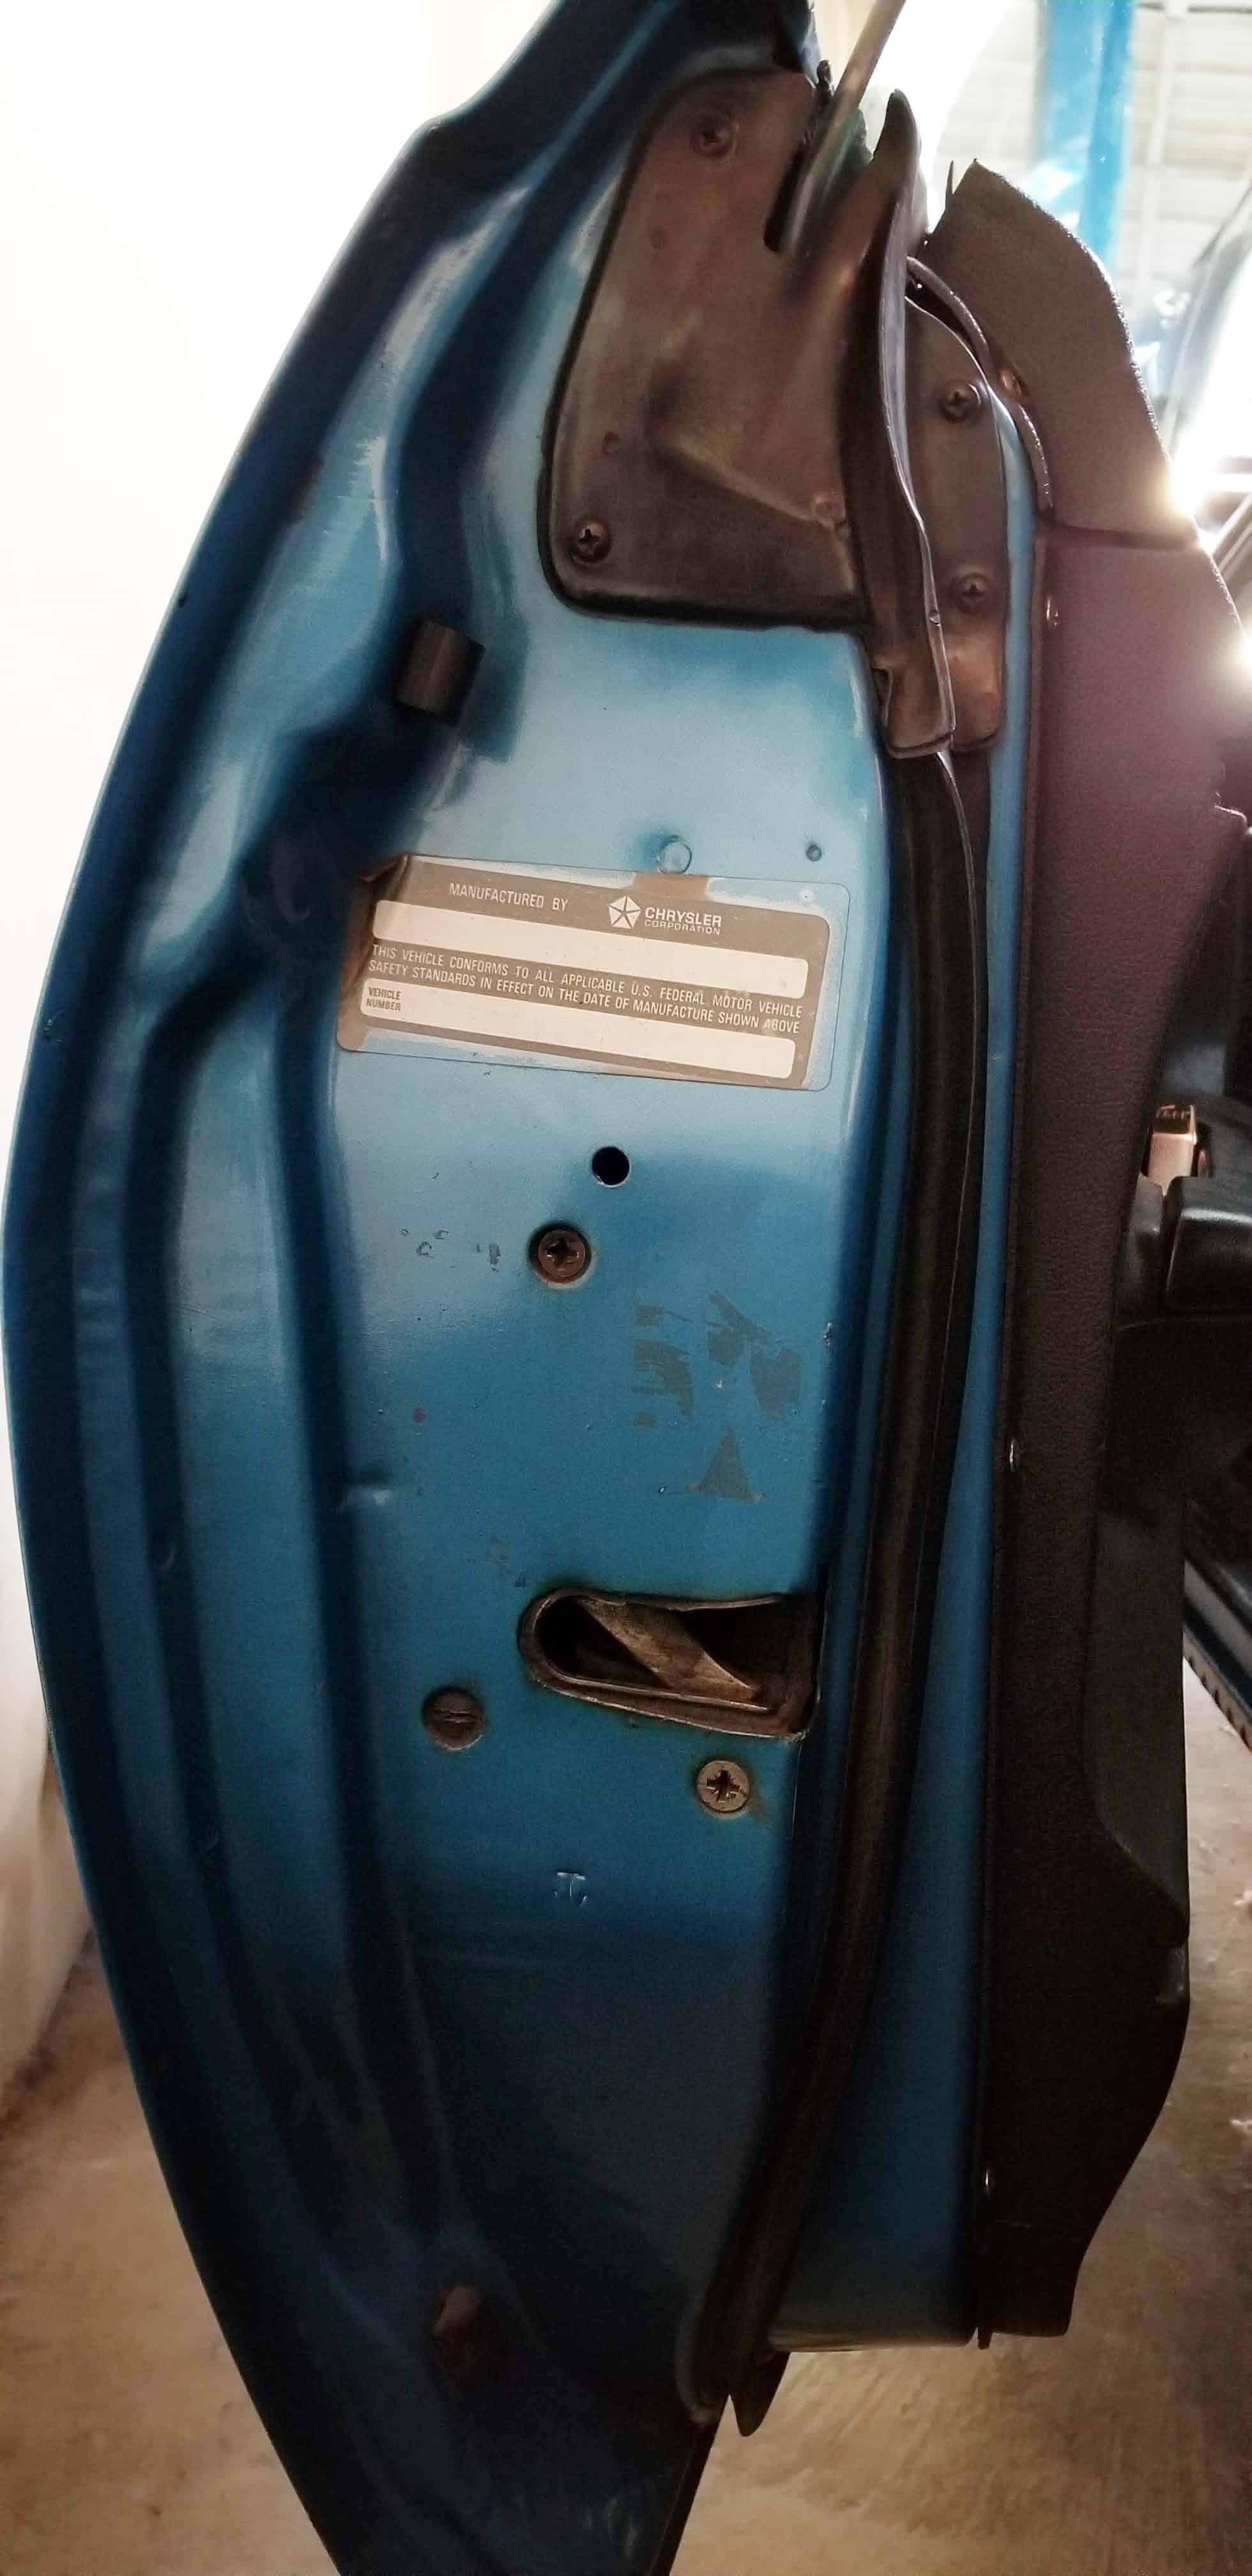
Now, let’s take a look at the door pillar on the Camaro below:
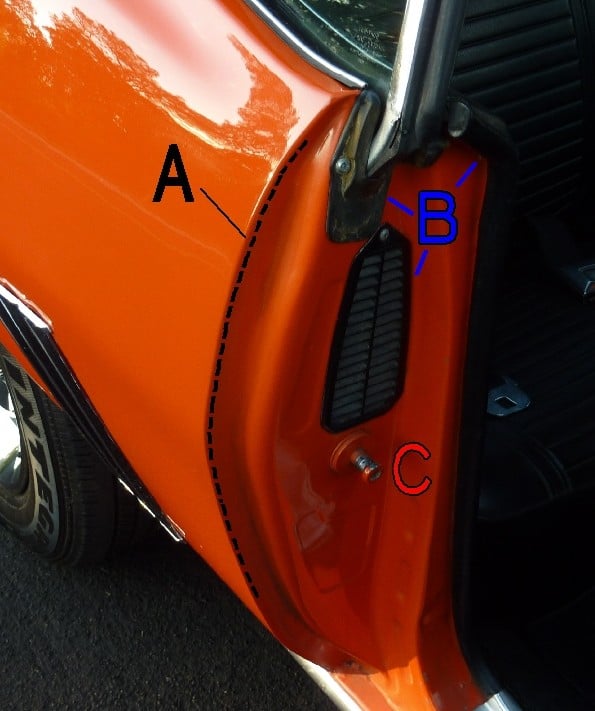
B. Remember that cars are painted as a bare shell from the factory. Rubber moldings, vents, stickers, labels, and door latches are added after the fact, so they shouldn’t have a hint of paint on them.
C. Door latch assemblies are only installed after the car leaves the paint booth, so there should be zero overspray here. Since this hinge is difficult to tape off, it is very easy to get overspray along the mounting point of the hinge. There have been many instances where lazy body shops simply paint the entire hinge with the repair. The paint will wear off at the metal-on-metal contact points from opening and closing the door. Walk around to the other side of the car and compare the door jambs. Remember, a factory paint job is exactly uniform on both sides. If one side looks different, it is the result of paintwork.
A. There shouldn’t be a single spec of paint on the door latch components, as mentioned earlier.
B. Always look at hardware! Remember this rule: No hardware on the B pillar or door jambs will ever be painted by the factory. (The exception: door hinge hardware holding the rear door on a 4dr vehicle. Corvettes are also a known exception, and is one of many reasons Corvettes are excluded from this article).
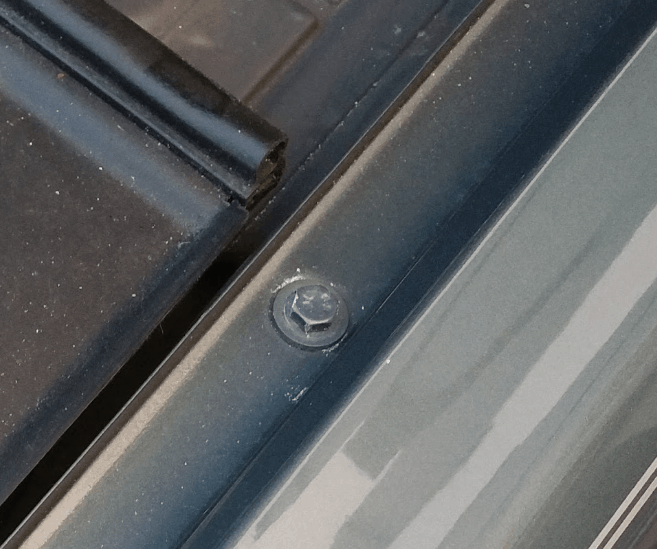
The hardware in these areas hold latches, latch stops, weatherstripping and trim pieces – all of which are installed after the body shell leaves the paint shop. Door hinge bolts are the only hardware that should be painted. Rule #2: No screw heads will ever be painted by the factory (anywhere on the car), as any item held by a screw is installed after the body shell leaves the paint shop. In general, the only hardware that comes painted from the factory are the bolts holding the body panels (and their accompanying hinges) together. This hardware will be completely covered in paint, by the way – not half painted or partially covered in overspray.
C. Look carefully for overspray around VIN stickers, tire loading labels, and emblems. Most of these stickers are required by federal law and cannot be easily removed. For this reason, body shops will tape over them and trim excess tape from around the perimeter using an X-acto knife, leaving it vulnerable to overspray around the edges.
If you’re ever unsure about anything, and both sides of the car are the same, you can reference photos from restoration bibles, factory brochures, factory/promotional photos or inspect a low mileage survivor in person. You can also send pictures to a known expert in the field for verification.
Now it’s time to see what an original, unpainted jamb and door pillar are supposed to look like. Below are photos of an unrestored, 53k mile Plymouth Cuda from 1970 that retains all of its original paint:
(to view full size image in desktop view, simply right-click image and select “open image in new tab” – then zoom in. Otherwise, simply zoom in on your phone or tablet)
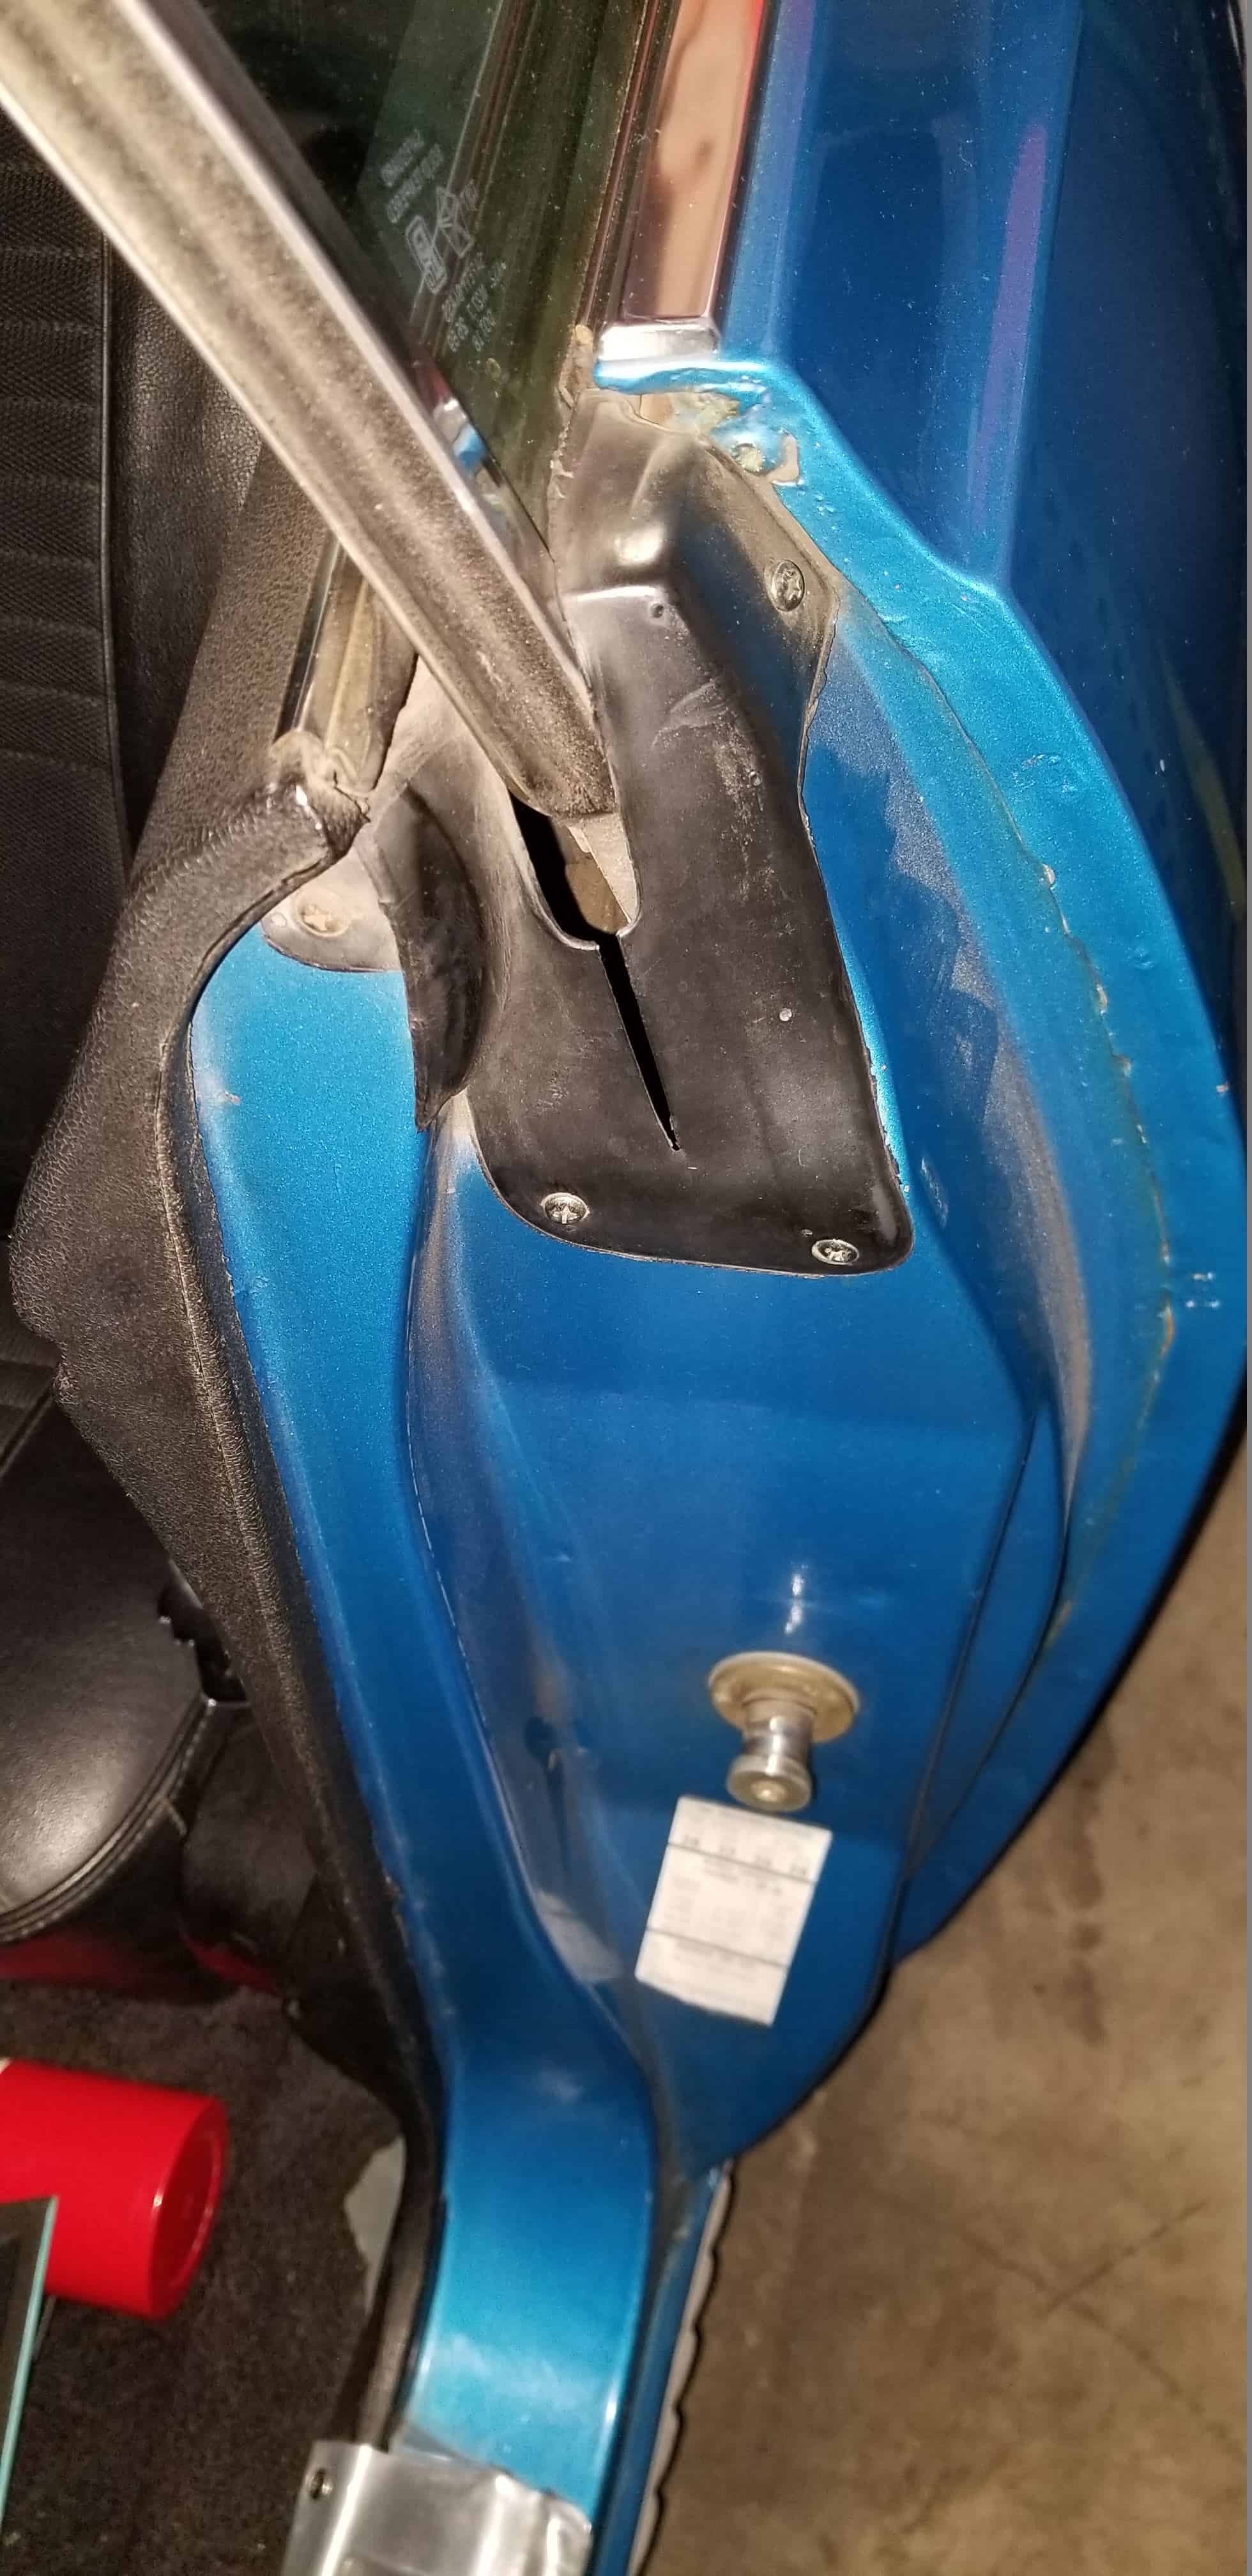
Second photo: Compare this to the Camaro door jamb above, and it’s night and day. The hardware and door latch have no paint whatsoever. The weatherstripping is free of overspray. No tape lines anywhere. Trust me when I say this is a nice car!
DOOR HINGES
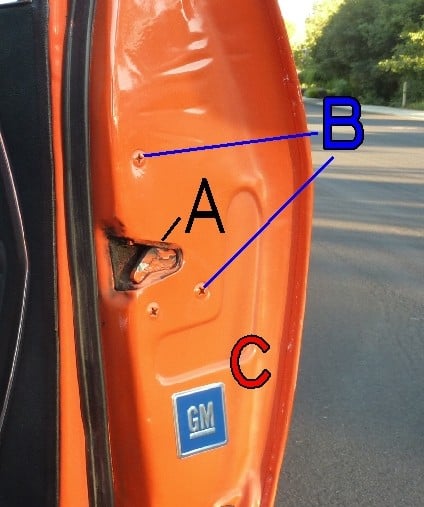
This next photo is of the door hinge on the Camaro. Notice half painted hardware (A), unpainted hardware with evidence of tampering (B), and missing hardware (C). Bottom line, get in the habit of inspecting the hinge area – it can hide a lot of secrets about a car!
PAINT CHIPPING AND PEELING
Aftermarket paint jobs wear much differently over time than a factory paint job. I am specifically referring to paint chipping and peeling.
You see, manufacturers go through great lengths to ensure their paint doesn’t chip easily under normal wear and tear, and the reason is for rust prevention. The paint on your new car comes with a warranty, and is designed to last for many years before failing. The factory paint shop goes through great lengths to ensure complete coverage and adhesion of the e-coat, primer, basecoat, and clearcoat. Even back in the 80’s and 90’s, car makers were applying extra layers of primer (or urethane) to areas most prone to paint chip damage, such as the hood, lower door area, and rocker panels. From the painstaking surface prep, full body electro dipping, and 300 degree oven baking with 360 degree coverage – this extensive process contributes to a tough, durable finish that cannot be matched by the refinishing industry.
Each coat is cured so completely, with a crosslink bond so strong, that shallow dents can me made in the panel without the paint chipping or peeling (this is also due to the flexible properties of modern factory paint). This strength extends to the panel edges and corners, where the chemical bond is equally robust. While paint chips are impossible to avoid entirely (especially at the nose of the car, or edge of an open door banging against a wall), the manufacturer goes through the effort of supplying dealerships with touch-up paint sticks so customers can cover up any exposed metal. Bottom line, factory paint does NOT chip easily under normal wear and tear, and it will NEVER peel off!
This applies to both modern base coat/clear coat as well as the old acrylic lacquer paint, which leads us to question the door on this 1954 Corvette below. I captured this around 2012 during a pre-purchase inspection, when the owner claimed the car was “wearing it’s original paint from 1954”. He claimed that this was “patina” from frequent use and that “this is what 60 year old paint looks like”.
Oh boy … he couldn’t be more wrong …
The painter didn’t even bother removing the chrome door molding and side mirror. He simply masked them off and sprayed away. The problem now is that there is a raised paint “lip”, or exposed edge, running along the door molding, and this exposed “edge” is prone to lifting and peeling. When a paint chip occurs on an aftermarket paint job, that chip tends to get bigger over time (due to inadequate adhesion). You will not see this occur on the factory paint finish – the paint chips you see on the nose of your hood will remain the same size for years.
Now, we all know that most body shops use standalone heat lamps to cure paint on a freshly painted panel. This heat lamp can only focus on one part of the panel (the center), preventing the edges of the panel from reaching the required temperature. This means incomplete curing and sub-par adhesion around the perimeter, further increasing the paint’s chance of failing in these areas. This is why your average aftermarket paint job tends to be “weak” around the edges.
The extent of the peeling in this photo took years to happen, which means this is an older repaint that probably occurred before the owner acquired the car. The sad part is that he mistook this old, worn paint as the original paint (and because the previous owner told him it was). Now I’m not saying your factory lacquer paint job is perfect – over time it will lose its gloss and fade (and even crack) … but it will never peel like this.
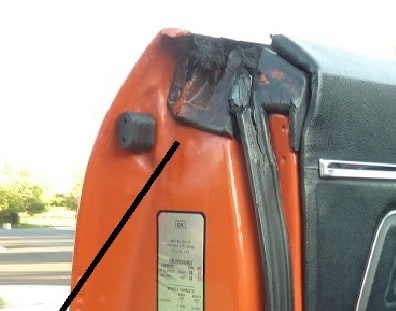
Fast forward to the 21st century, and you’ll see less obvious evidence like the Jaguar door below. A key giveaway that paint work has been done is when you see paint chips in areas that aren’t prone to paint chip damage. While its possible for the original paint to get nicked by a sharp object (like a screwdriver), factory paint will never chip off in the manner you see in the below photos. (Seriously, the next time you’re at a Pick n’ Pull, take a screwdriver and try and nick the original paint off a door in this area. You couldn’t replicate this damage in a million years.) This phenomenon is due to incomplete adhesion from improper prep or curing. Also, this being my mothers car, I can confirm that the door does not open and close as it should. This door has clearly been removed, painted, and reattached without proper alignment, and the result is that it refuses to function as cleanly as the driver side door.


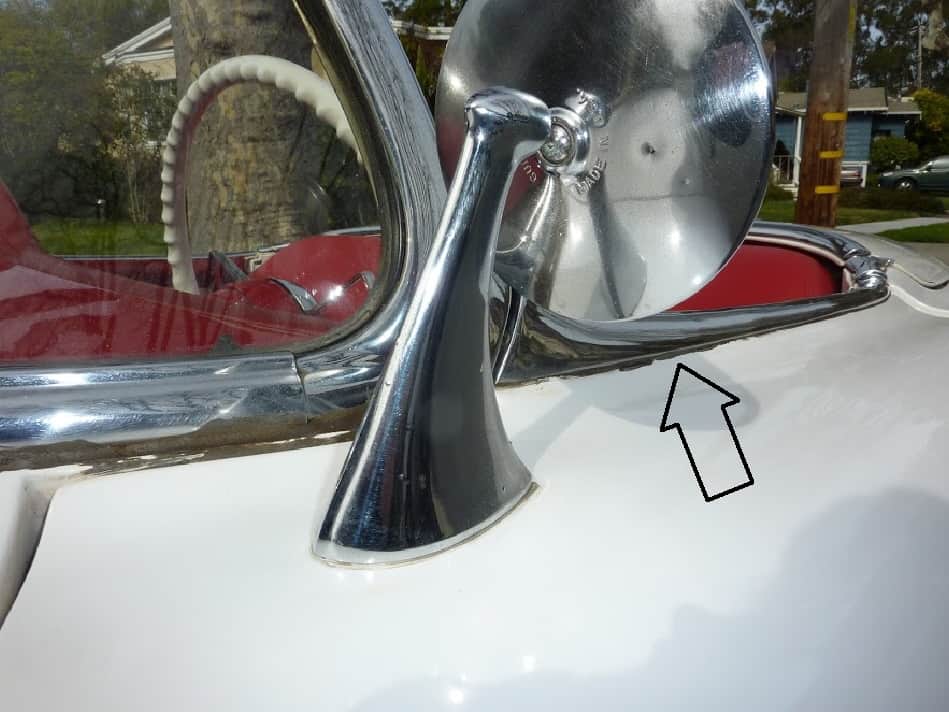
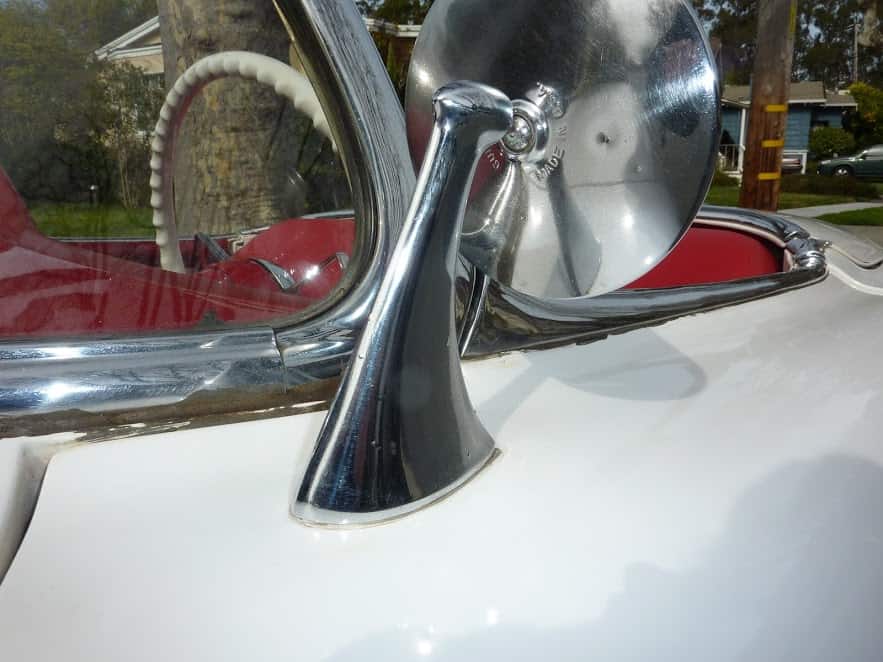
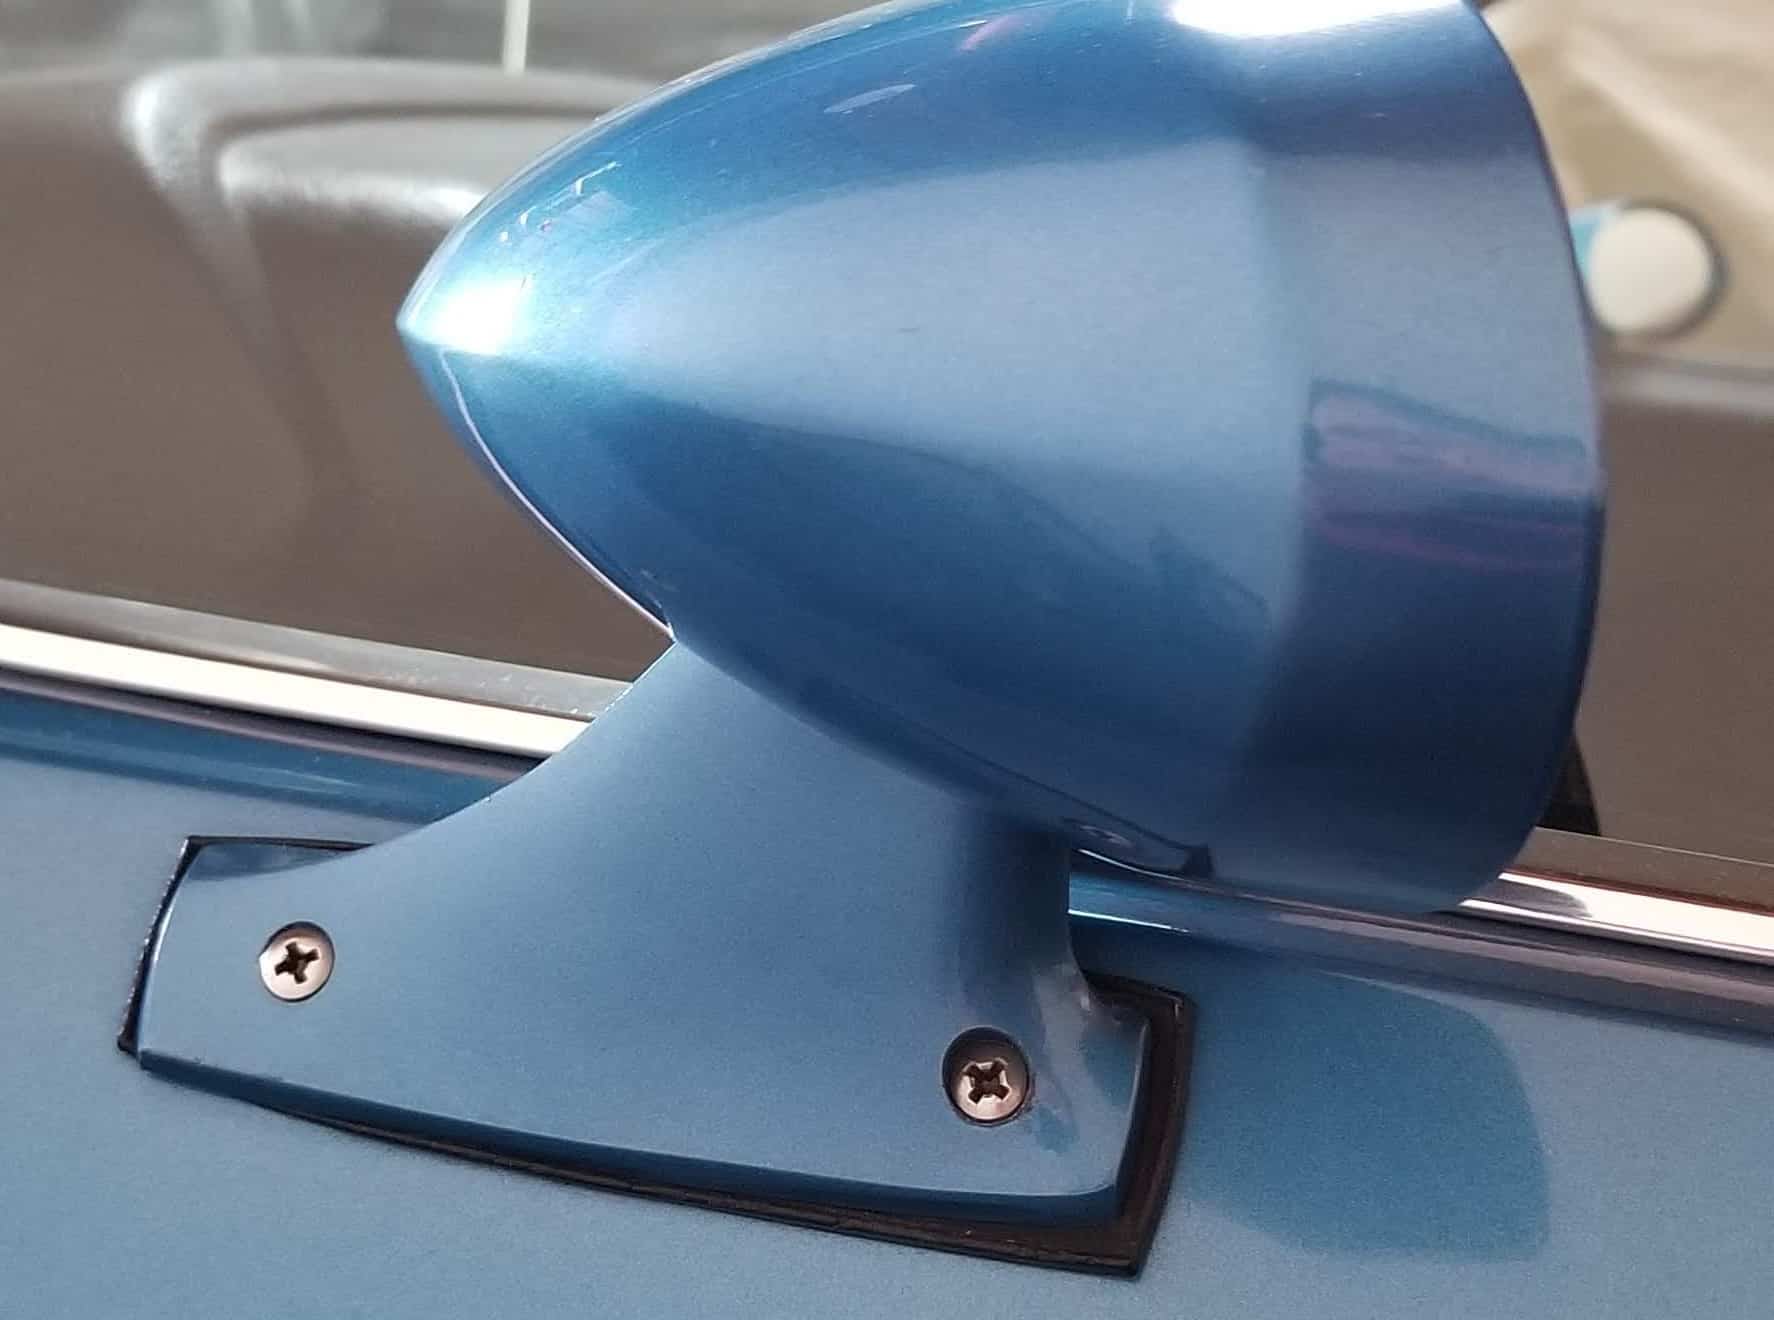
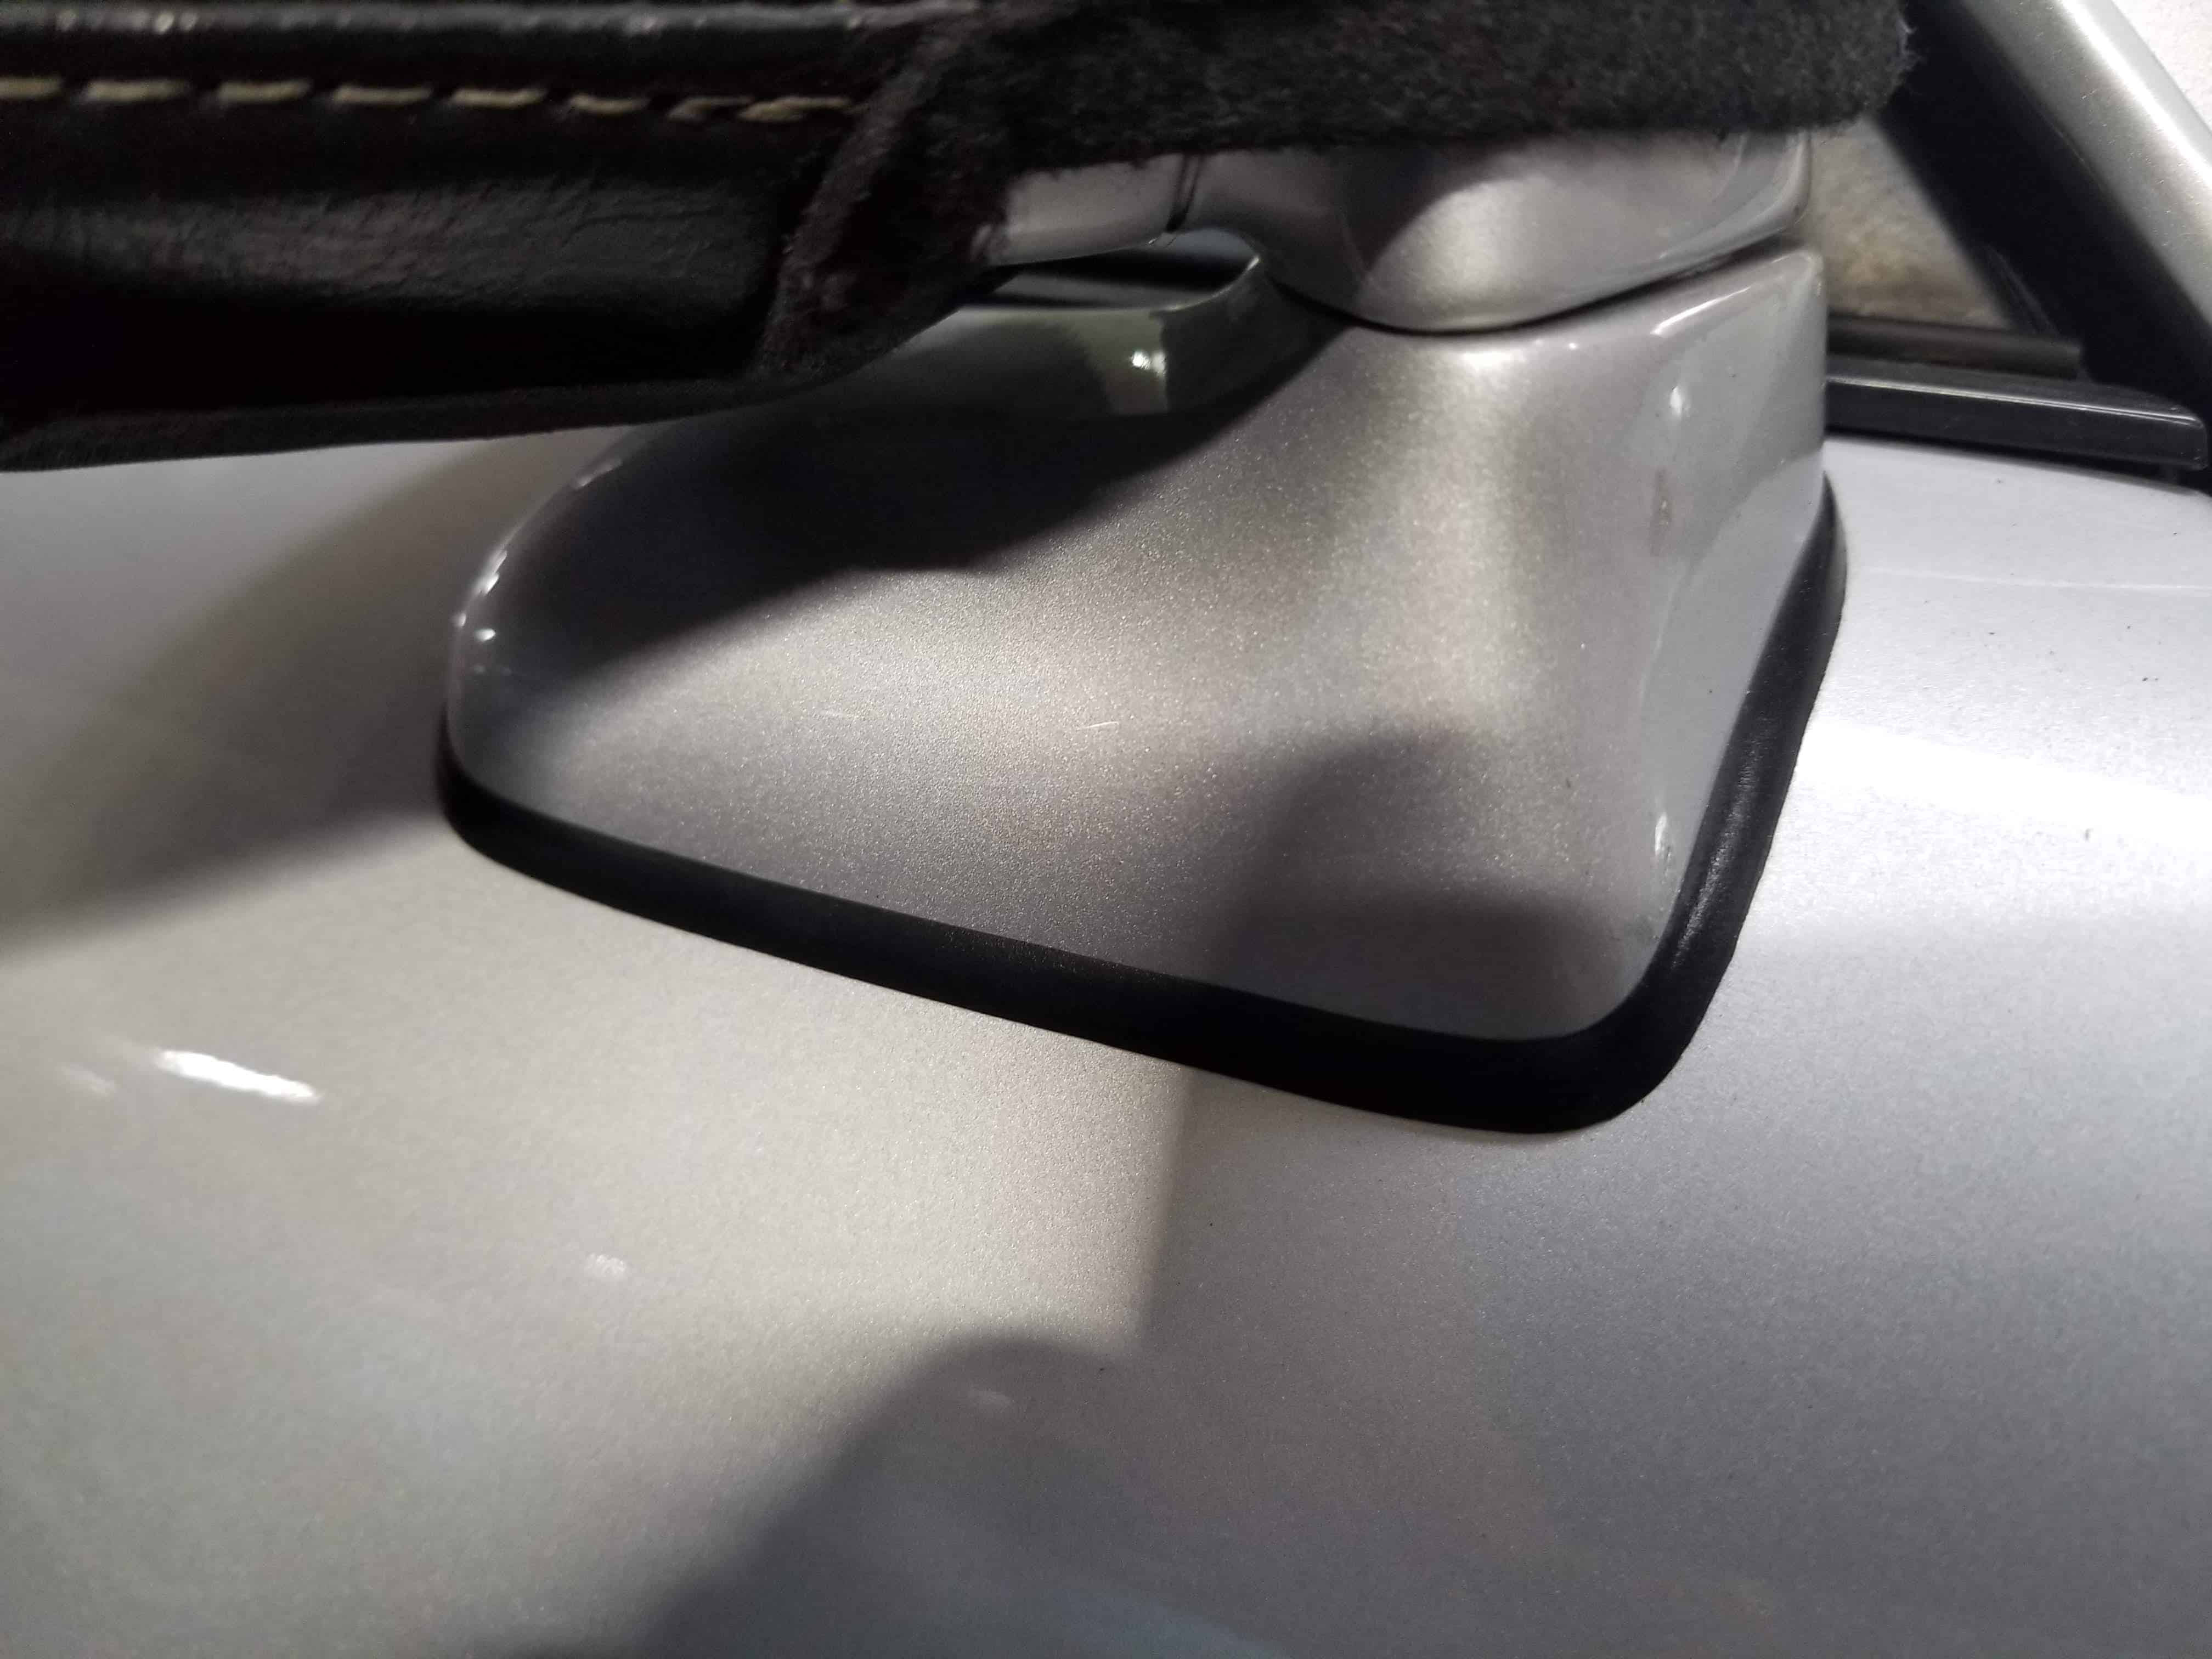
BASE OF THE SIDE MIRROR
With the exception of classic cars, side mirror removal requires removal of the door panel first. The door panels on modern cars can be a pain to remove, so it’s no surprise that some body shops simply leave the mirror installed when repainting a door. This means you may see a thin line of overspray around the mirror base, such as the white Corvette below. At the factory, side mirrors are always installed after the car is painted, so the base should look clean and unmarked like the one on this 53k mile survivor ‘Cuda (blue).
MISSING, MISMATCHING, AND PAINTED HARDWARE
Think back to all the “How It’s Made” episodes you’ve seen on T.V. and recall the empty body shells rolling through the paint booth. The only bolts that are painted body color from the factory are the bolts holding body panels and hinges. You shouldn’t see a spec of paint on any screw or rivet. Any item attached by a screw or non-structural rivet is installed after the shell leaves the paint booth.
Also, if you look closely at body panel hardware, you can usually tell when it’s been removed. The impact guns used at body shops can slightly round the edges of the bolt heads, revealing unpainted metal on a bolt that should be uniformly covered in paint. Look for evidence that a bolt has been unseated. Now, there aren’t many reasons a fender bolt would require removal other than fender replacement or to perform bodywork on the original fender. Also, don’t worry if you see missing or mismatching hardware on the plastic wheel well liners (these usually have to be removed during fender removal). Suspension and axle service requires access through the wheel well, which also requires removal of these liners.
It is very important to visually compare door jamb, trim, and weatherstripping hardware on both sides of the car. The factory will use the same hardware on each side. Look for worn or mismatching screws and varying bolt sizes. Now, this particular hardware could have been removed for many reasons other than paint work (audio system install, etc) so treat it only as a red flag, and keep looking in nearby areas for more obvious signs of repaint.
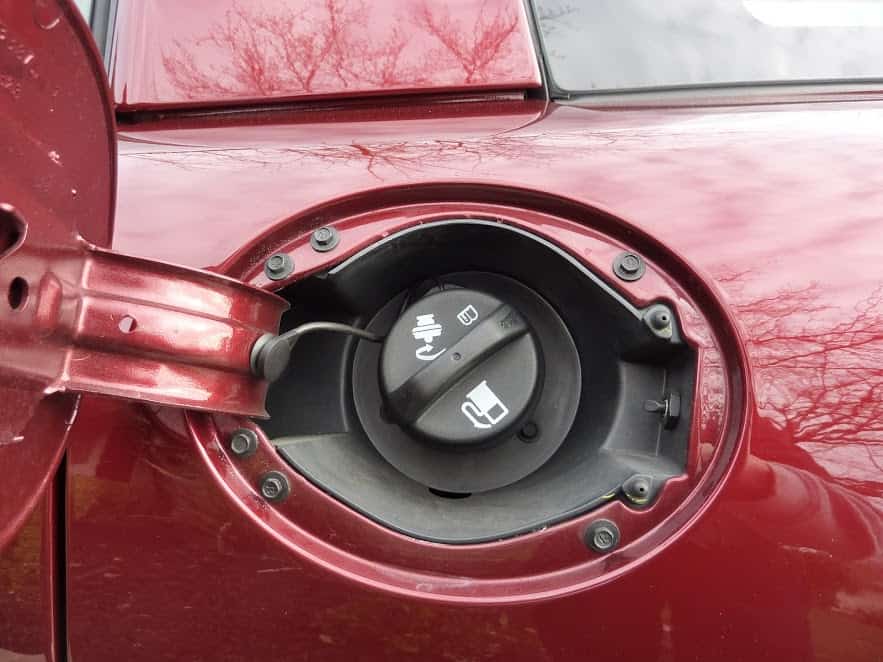
FUEL FILLER DOOR
Secondly, it can reveal an excessive amount of dirt and debris (despite the rest of the car appearing clean and detailed). Sellers will claim the car is “always kept indoors, never driven in the rain, etc”… but when you open the fuel door, you see caked mud and dried leaves. This only results from a car sitting outdoors for long periods at a time. If this much filth found its way inside the fuel door, imagine how dirty the car once was (and how many storms it’s been through!)
The photo represents what you should see. A clean area with no overspray or tape lines. No paint chipping around the edges. The hardware holding the plastic filler neck shield is unpainted, as this cover is added after the car leaves the paint booth. Open the fuel door of every single car you inspect.
ENGINE COMPARTMENT AND COWL
If you see black overspray on or near the cowl area on older cars, don’t be so quick to jump to conclusions. Some cars (notoriously 60’s American cars) left the factory with a “blackout” treatment on the cowl and/or firewall and radiator support. The blackout treatment was added at a separate booth after the body was painted. Since this was applied by hand on a freshly painted body shell, masking of the area was required. Considering this was in a rushed factory setting, all recipients of this treatment left the factory with some degree of overspray around the masking line (some worse than others). Note that it should only be black overspray on top of the body color – if its the other way around, there was paintwork done.
Our 53k mile 1970 ‘Cuda, with original paint on it’s entire body, was an early build car (pre-April) which means it received a cowl “blackout” treatment from the factory (being a light colored car) according to factory engineering prints (right click link, open in new tab to zoom in). You can see a slight amount of overspray in the photo. This car is lucky – it really isn’t that bad.
Now another hot topic is whether or not the car in question came from the factory with a black engine bay or body colored engine bay. The best way to determine what your car had is to look at promotional photos, brochures, factory photos, period assembly plant documentaries, preservation class winners, etc. Sometimes only light colored cars received the “blackout” treatment, like the ‘Cuda above.
In general, most American cars (except Mopar) had black engine bays after 1963. Some had them as early as 1962, but prior to that year, all American cars came with body colored firewalls.
Some other guidelines:
– No Corvette came with a body colored engine bay – ever.
– Unibody cars (such as Mopars) generally had body-color paint in the engine bay, including the firewall and cowl.
– Most classic European cars had body color firewalls.
– Porsche 911’s received body color engine bays after 1973.
Bottom line, it varies drastically between cars and model years simply because of the lack of consistency between different plants of the same make (US spec vs Canadian spec, only cars built after a certain month of the year received blackout, etc.) This topic requires that you consult experts in the field.
TRUNK AREA AND RAIN GUTTERS
The rain gutters along the trunk, quarter panels, and fenders can expose a few clues, including tape lines and overspray. Make it a habit to not only open the trunk, but to scan along these gutters as well. This will reveal paintwork of either the quarter panels, trunk, back window area, or all of the above.
A red flag is when you see a rain gutter that is much cleaner (and shinier) on one side of the car than on the other side. If the car has been driven and used, you can expect the gutters to be (equally) dirty and slightly faded from rain water and debris. Looking at the driver’s side, you can see the rain gutter looks dull and dirty. The car is a 1998 with 100k miles on it, so this is completely expected. The passenger side, however, is completely clean and shiny, as if the paint is newer.


The trunk sure looks clean on this Camaro! That is, until you zoom in on the gutters…
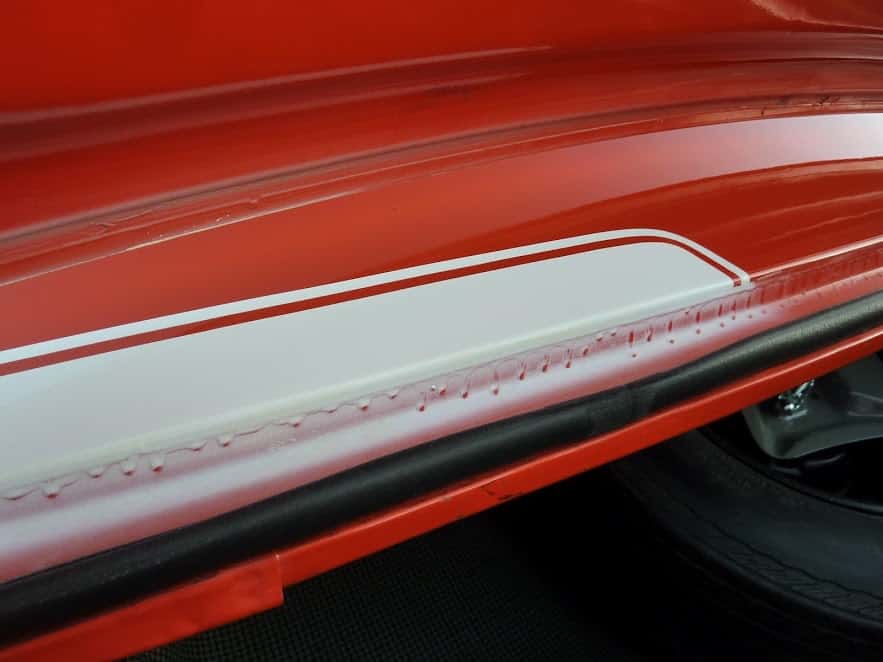
This is an excessive and blatantly obvious example, but I have seen this area look entirely spotless and perfect upon close inspection … except for one tiny drip mark. Just one! That’s all it takes to give it away! This is a common problem area – don’t overlook it!
KEYHOLE SURROUND AND DOORHANDLES

UNEVEN OR LARGE PANEL GAPS
Uneven panel gaps can sometimes be strong indicator that paint work has been done. We say “sometimes” because most high volume cars of the 60’s and 70’s (mostly American cars) did not have perfect gaps from the factory. The tooling equipment and quality control simply wasn’t anywhere close to today’s standards. Fast forward to the turn of the century (once electronic panel gap scanners came into play), and even the high volume mainstream cars began leaving the factory with acceptable gaps all around. It is very rare (if not impossible) for a panel to get bumped out of alignment without receiving some cosmetic damage. Yes, door panels can naturally swivel out of alignment on their own over time (a long time, I might add). But even with that exception, be sure to focus your close attention to the mounting points of the panel in question.
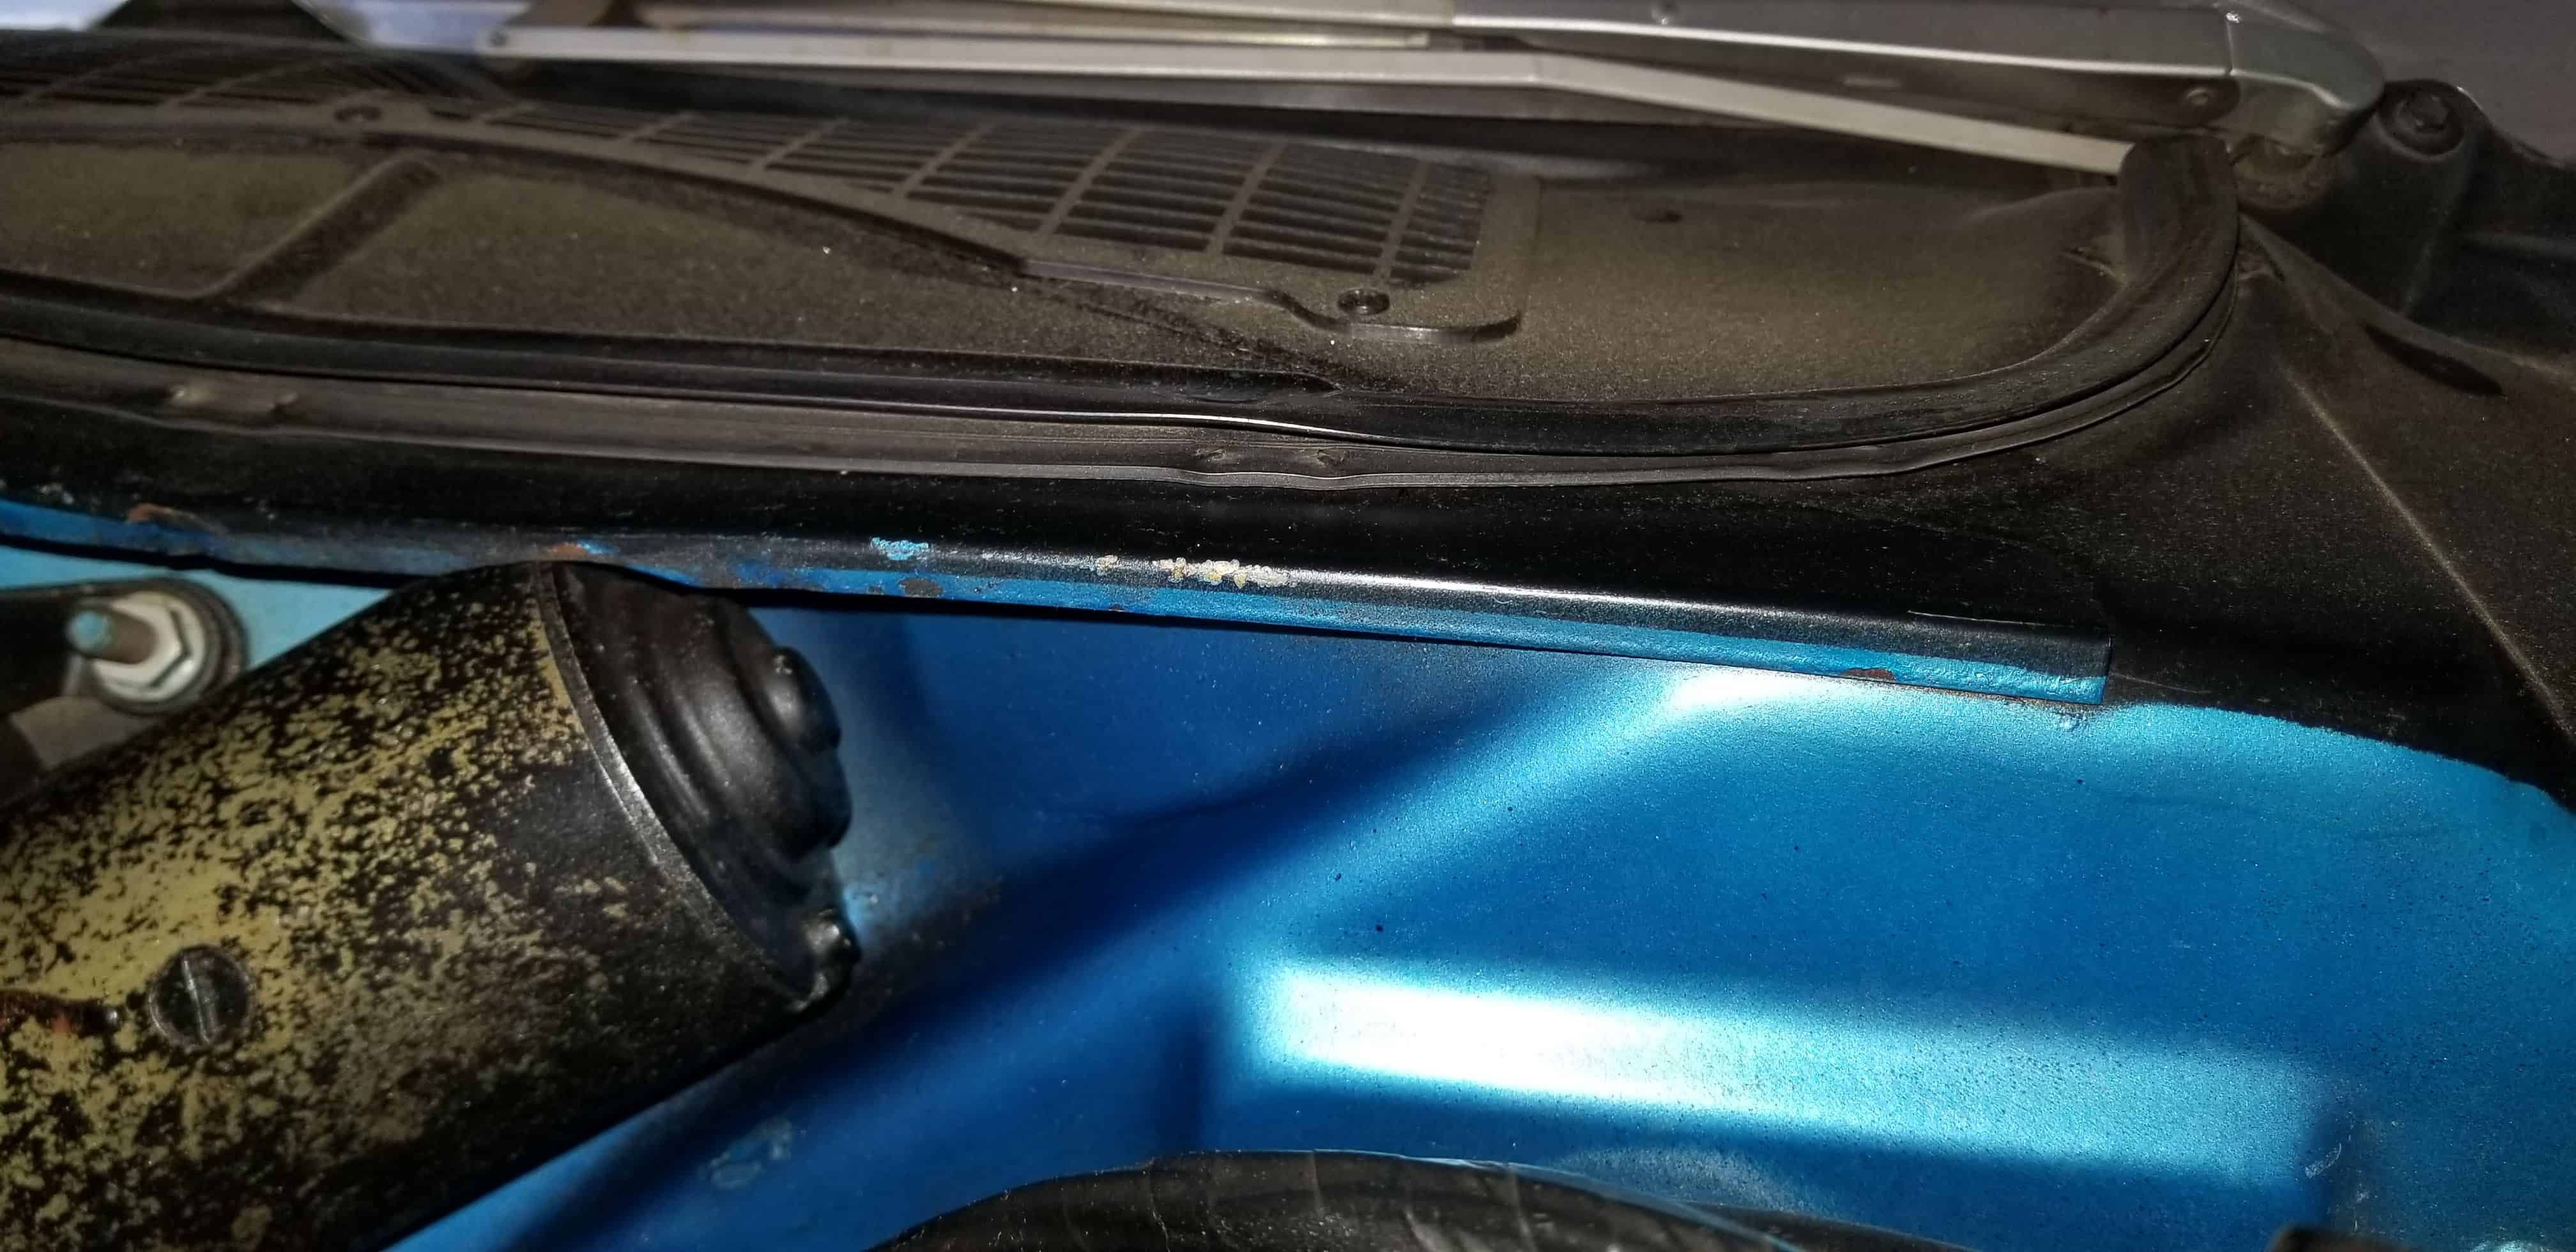
OVERSPRAY UNDERNEATH THE CAR
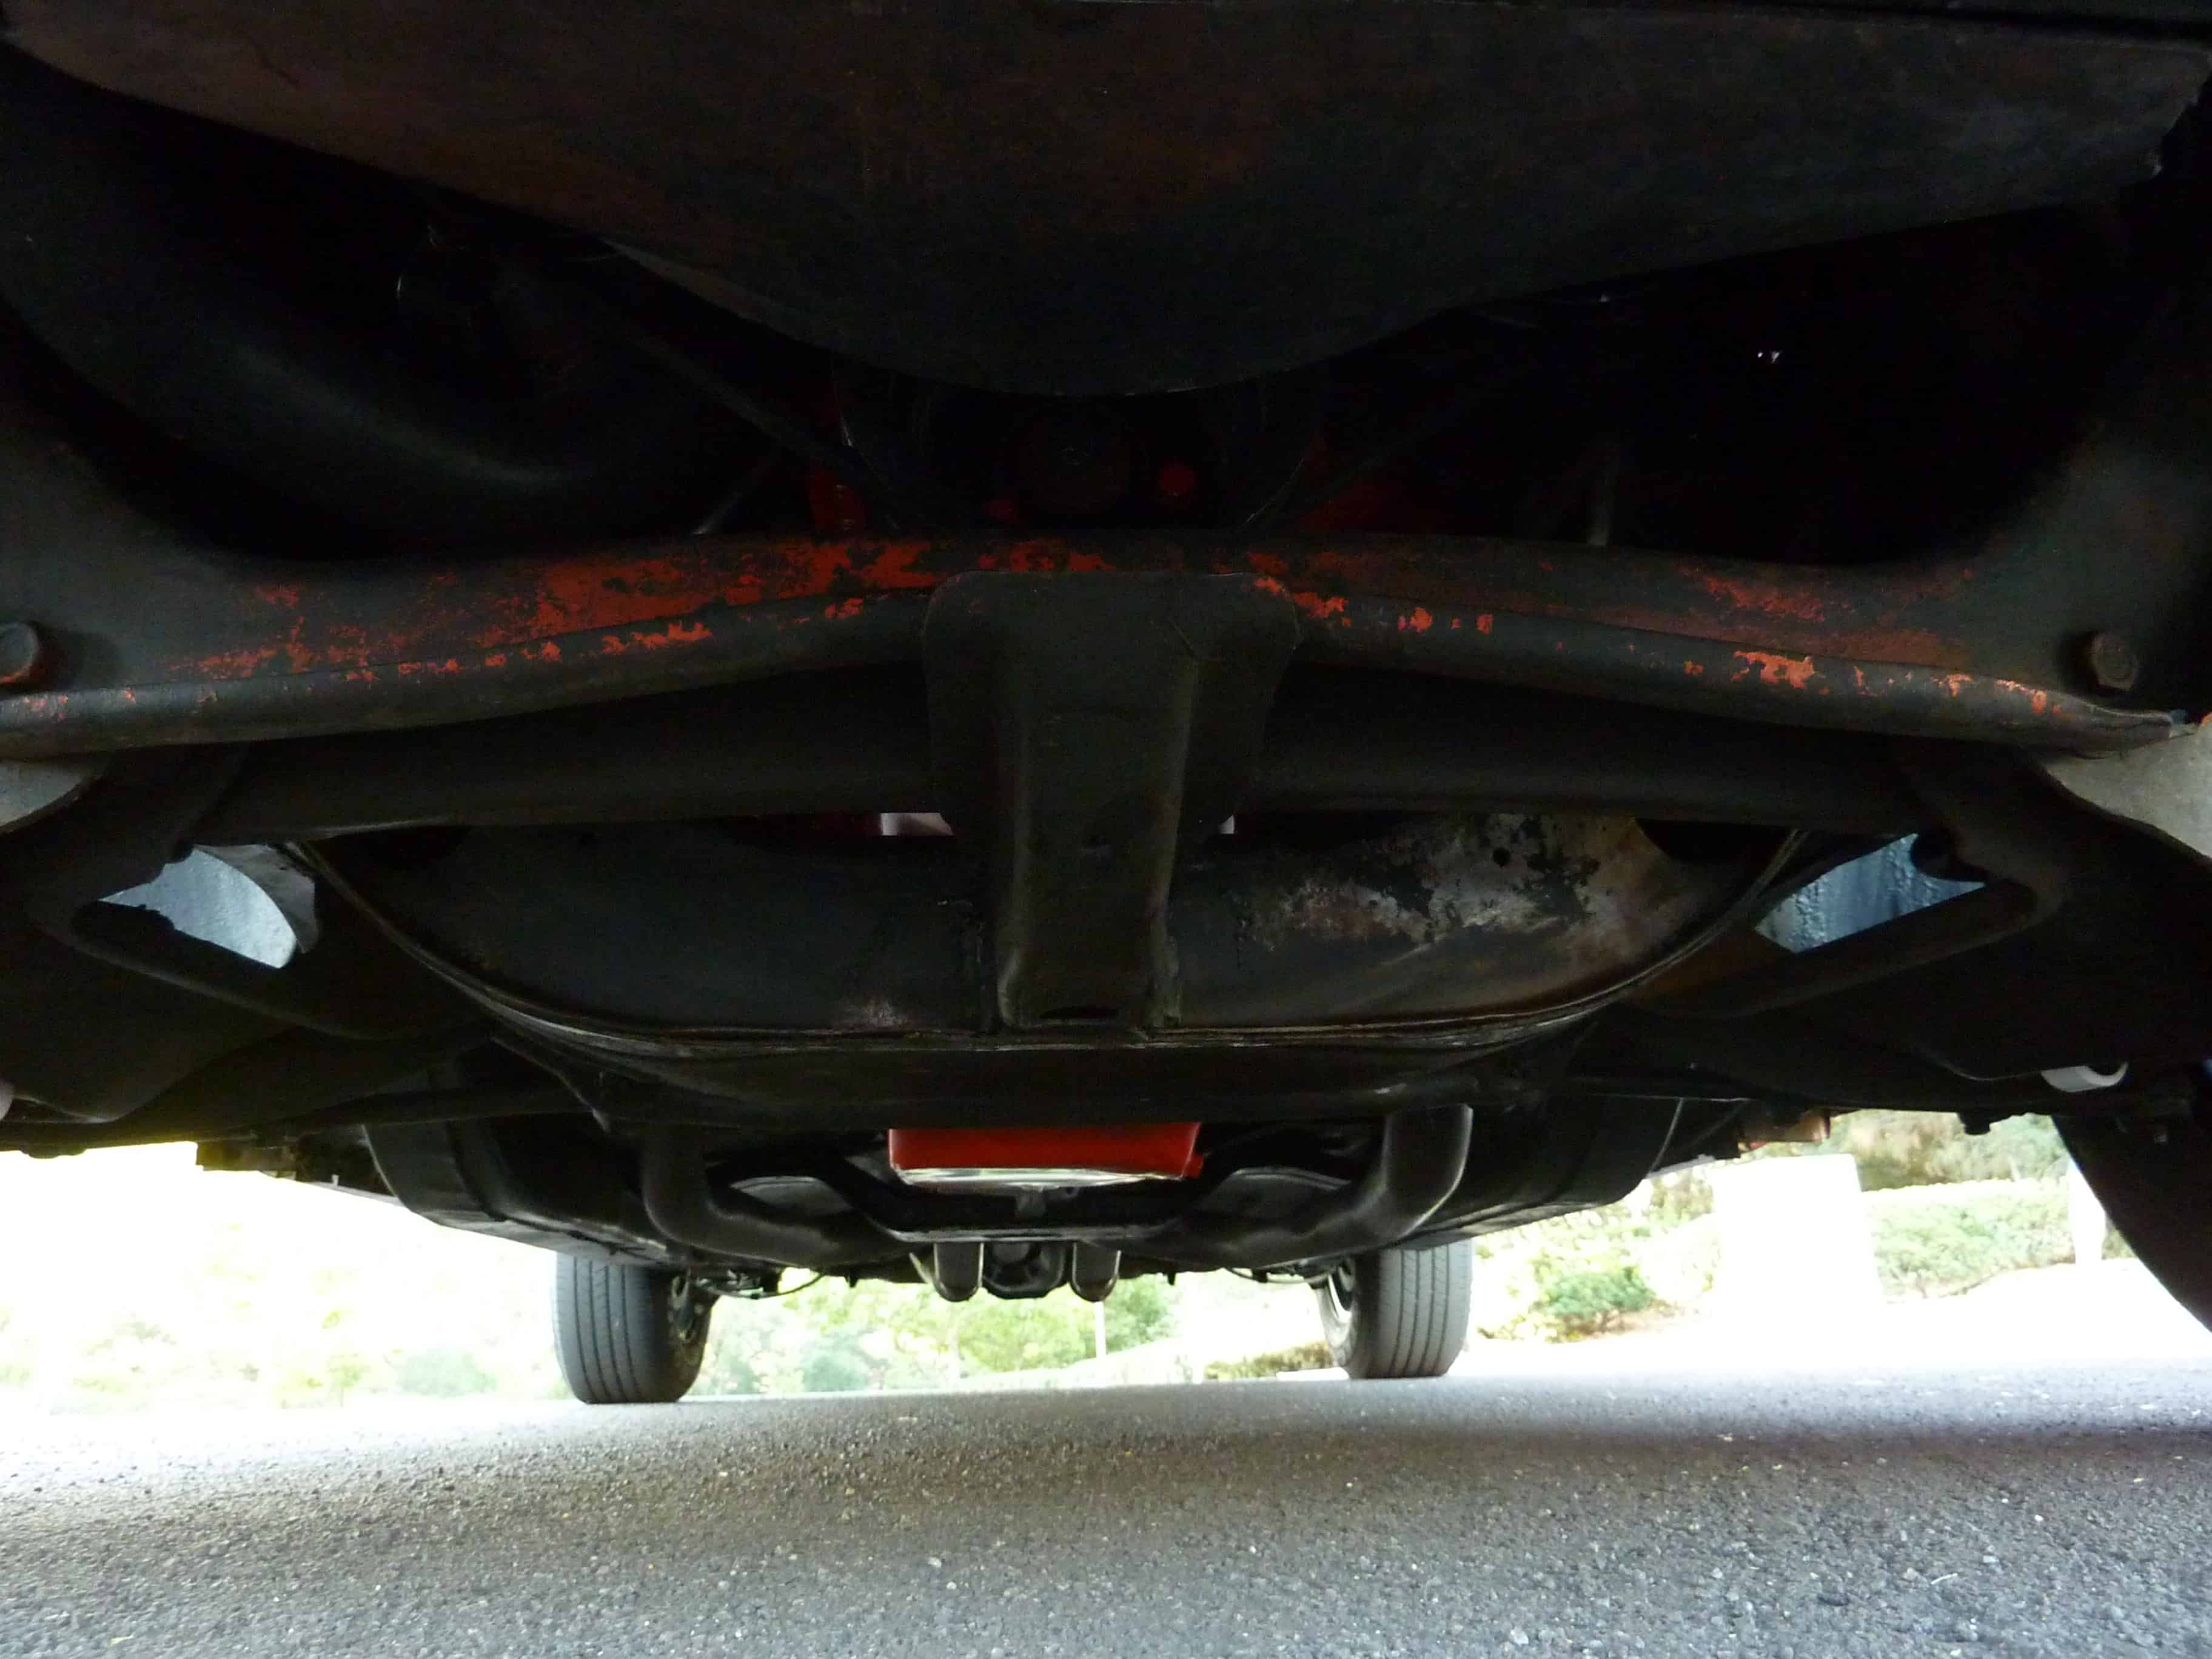
A dead giveaway that a car has received paintwork is when you see overspray underneath the car. Body shops almost never seal off the bottom of the car when painting (why would they?). As they are spraying, overspray travels underneath the car and lands on things like the gas tank, frame rails, rear valence, etc. Although this involves getting on your hands and knees, this is one of the easiest clues to spot, especially when the paint is any color other than black or grey.
From the factory, a body is painted as a bare shell, with no suspension, exhaust, or any other underbody components installed. So if you see overspray on any of said items, you can be certain it was done by a body shop.
But wait, didn’t some older cars leave the factory with overspray underneath?
Yes. You can see it here:
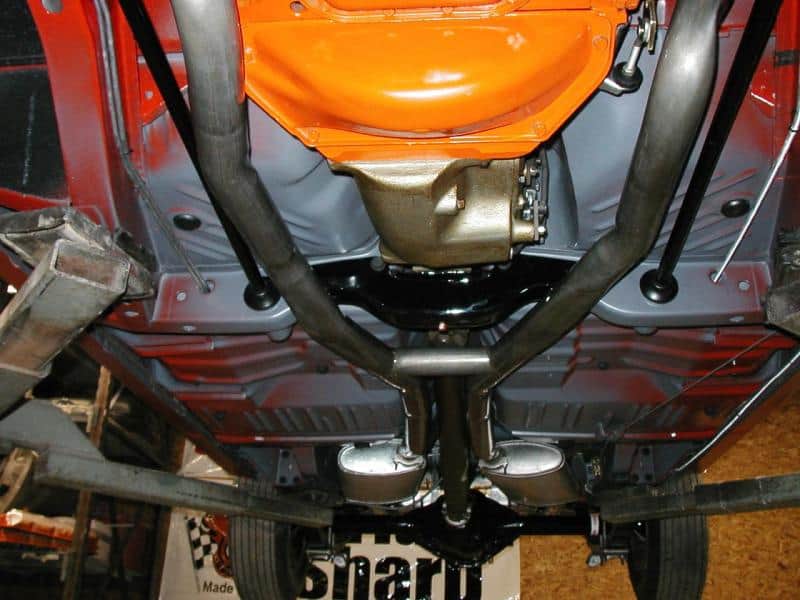
Study this picture carefully, as this is what true factory overspray looks like. Now even though this particular car is a restoration, it happens to be one of the most correctly restored Dodge Daytonas on the planet. The replicated overspray is highly accurate, and the attention to detail is one of the many reasons it received the notable OE Gold award at the Mopar Nationals. Owned by Mopar enthusiast Gene Lewis, this Mopar was optioned without any undercoating from the factory, which provides a pristine display of where factory overspray lands.
All cars of this era had primered undersides (the exposed grey color), yet not all of them received undercoating. In some cases, buyers had the option to forgo the coating, presumably to save weight and money (these were drag racers and track warriors after all). Notice how the overspray is only located on the physical body of the car (such as the floor pans). Everything from the brake lines, exhaust, crossmember, body bushings, and plugs are untouched. That is because all these items were installed after the car was painted. So if you see a drop of paint on any of those parts – it wasn’t done by the factory.
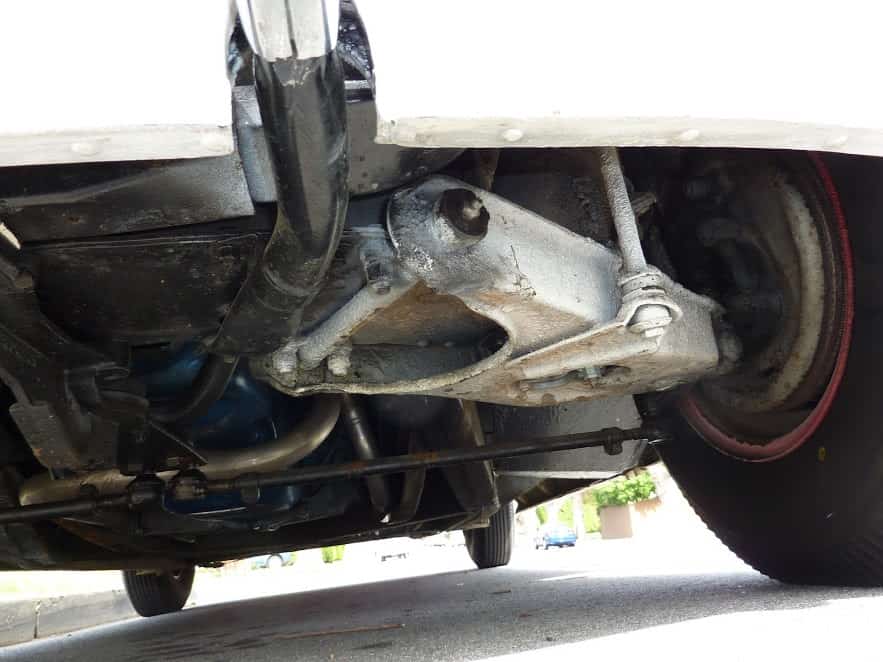
On the other hand, the owner of this 1954 Corvette (below) insisted that car retained all of its original paint, and that the white overspray was factory. The seller is clearly wrong (or lying) since we know that suspension parts are installed after the car is painted, and therefore should not have a single spec of body color paint.
VENT INSERTS, SCOOPS, DUCTS AND ROCK GUARDS

Things like hood vent inserts, rock protection guards, etc are applied after the body receives paint. Rub your finger along the perimeter – you shouldn’t feel an edge to the paint. If there is a raised paint edge around the perimeter, that means a body shop simply masked around the rocker guard before painting. Small amounts of overspray around the edge will confirm paintwork.
BUMPER COVERS
I should start off by saying that I rarely de-value a car that has a repainted front or rear bumper. If there is no structural damage, and if the color matching is spot on with the rest of the car, there’s no need to ding points for this. Plastic bumpers are designed to take the beating of parking nicks, scrapes, 5mph bumps, and road rash. They are also designed to be easily removed and painted. My point is, I’d rather have a repainted bumper (properly color matched) than one wearing original paint covered in nicks, stone chips, and scrapes (ugh, what a turn off).
However, if this is a valuable low mileage car, and you insist on knowing the truth, then there are a few ways to tell if the bumper cover has been painted.
The problem is that many cars leave the factory wearing bumpers with a slightly different shade from the rest of the body, so you can’t always confirm just by “looking” at it.
If you’re really finicky and you inspect cars on a normal basis, consider investing in an ultrasonic paint thickness gauge that measures non-metal surfaces. They aren’t that expensive anymore. Considering how many modern cars are assembled with composite and carbon fiber body panels, this tool can prove useful more often than not. You can compare thickness of both bumpers – an obnoxiously high reading on one or the other means the bumper has been painted. In general, both bumpers should have similar readings.
You can also look for signs that the bumper has been removed (required for painting). Look for uneven panel gaps and small signs of sagging and misalignment. You can also look underneath the car at the bumper hardware, and see if any hardware is missing or mismatched. Check if the bumper beam area shows any signs of prior damage.
MISSING OR MISMATCHING VIN STICKERS
While the act of labeling vehicle parts with a VIN# dates back to 1984 (the Motor Vehicle Theft Law Enforcement Act), it wasn’t until 1997 that all panels on cars received VIN numbers prove each panel is authentic to the car. If you come across a panel with a missing or mismatching VIN sticker (and it’s built after 1996), then that panel is not original to the car.
Carefully inspect the vin stickers, too. They don’t just peel and “fall off” over time – these stickers aren’t designed to be removed easily. When a body shop replaces a panel, they remove the vin in order to paint the new (used) door the correct color. If the used door happens to be the same color, the shop may just leave it on and not touch the area (usually that area won’t require paintwork). This is why you’ll see a mismatched vin – it’s from the donor car.
Since cars before 1997 are not consistent across the board with VIN markings, it is crucial that you research your specific model using original literature and sources like model-specific clubs and websites.
Here, our family 1998 Jaguar is missing the VIN sticker on the passenger door. Unfortunately this car was side swiped a few years ago, and a replacement used door was necessary. Removal of all components (including the stickers) from the door was required in order to paint it the correct color. Obviously, the shop wasn’t going to put the donor car’s VIN sticker back on, and it’s illegal to swap VIN stickers between panels, so it simply gets left off.
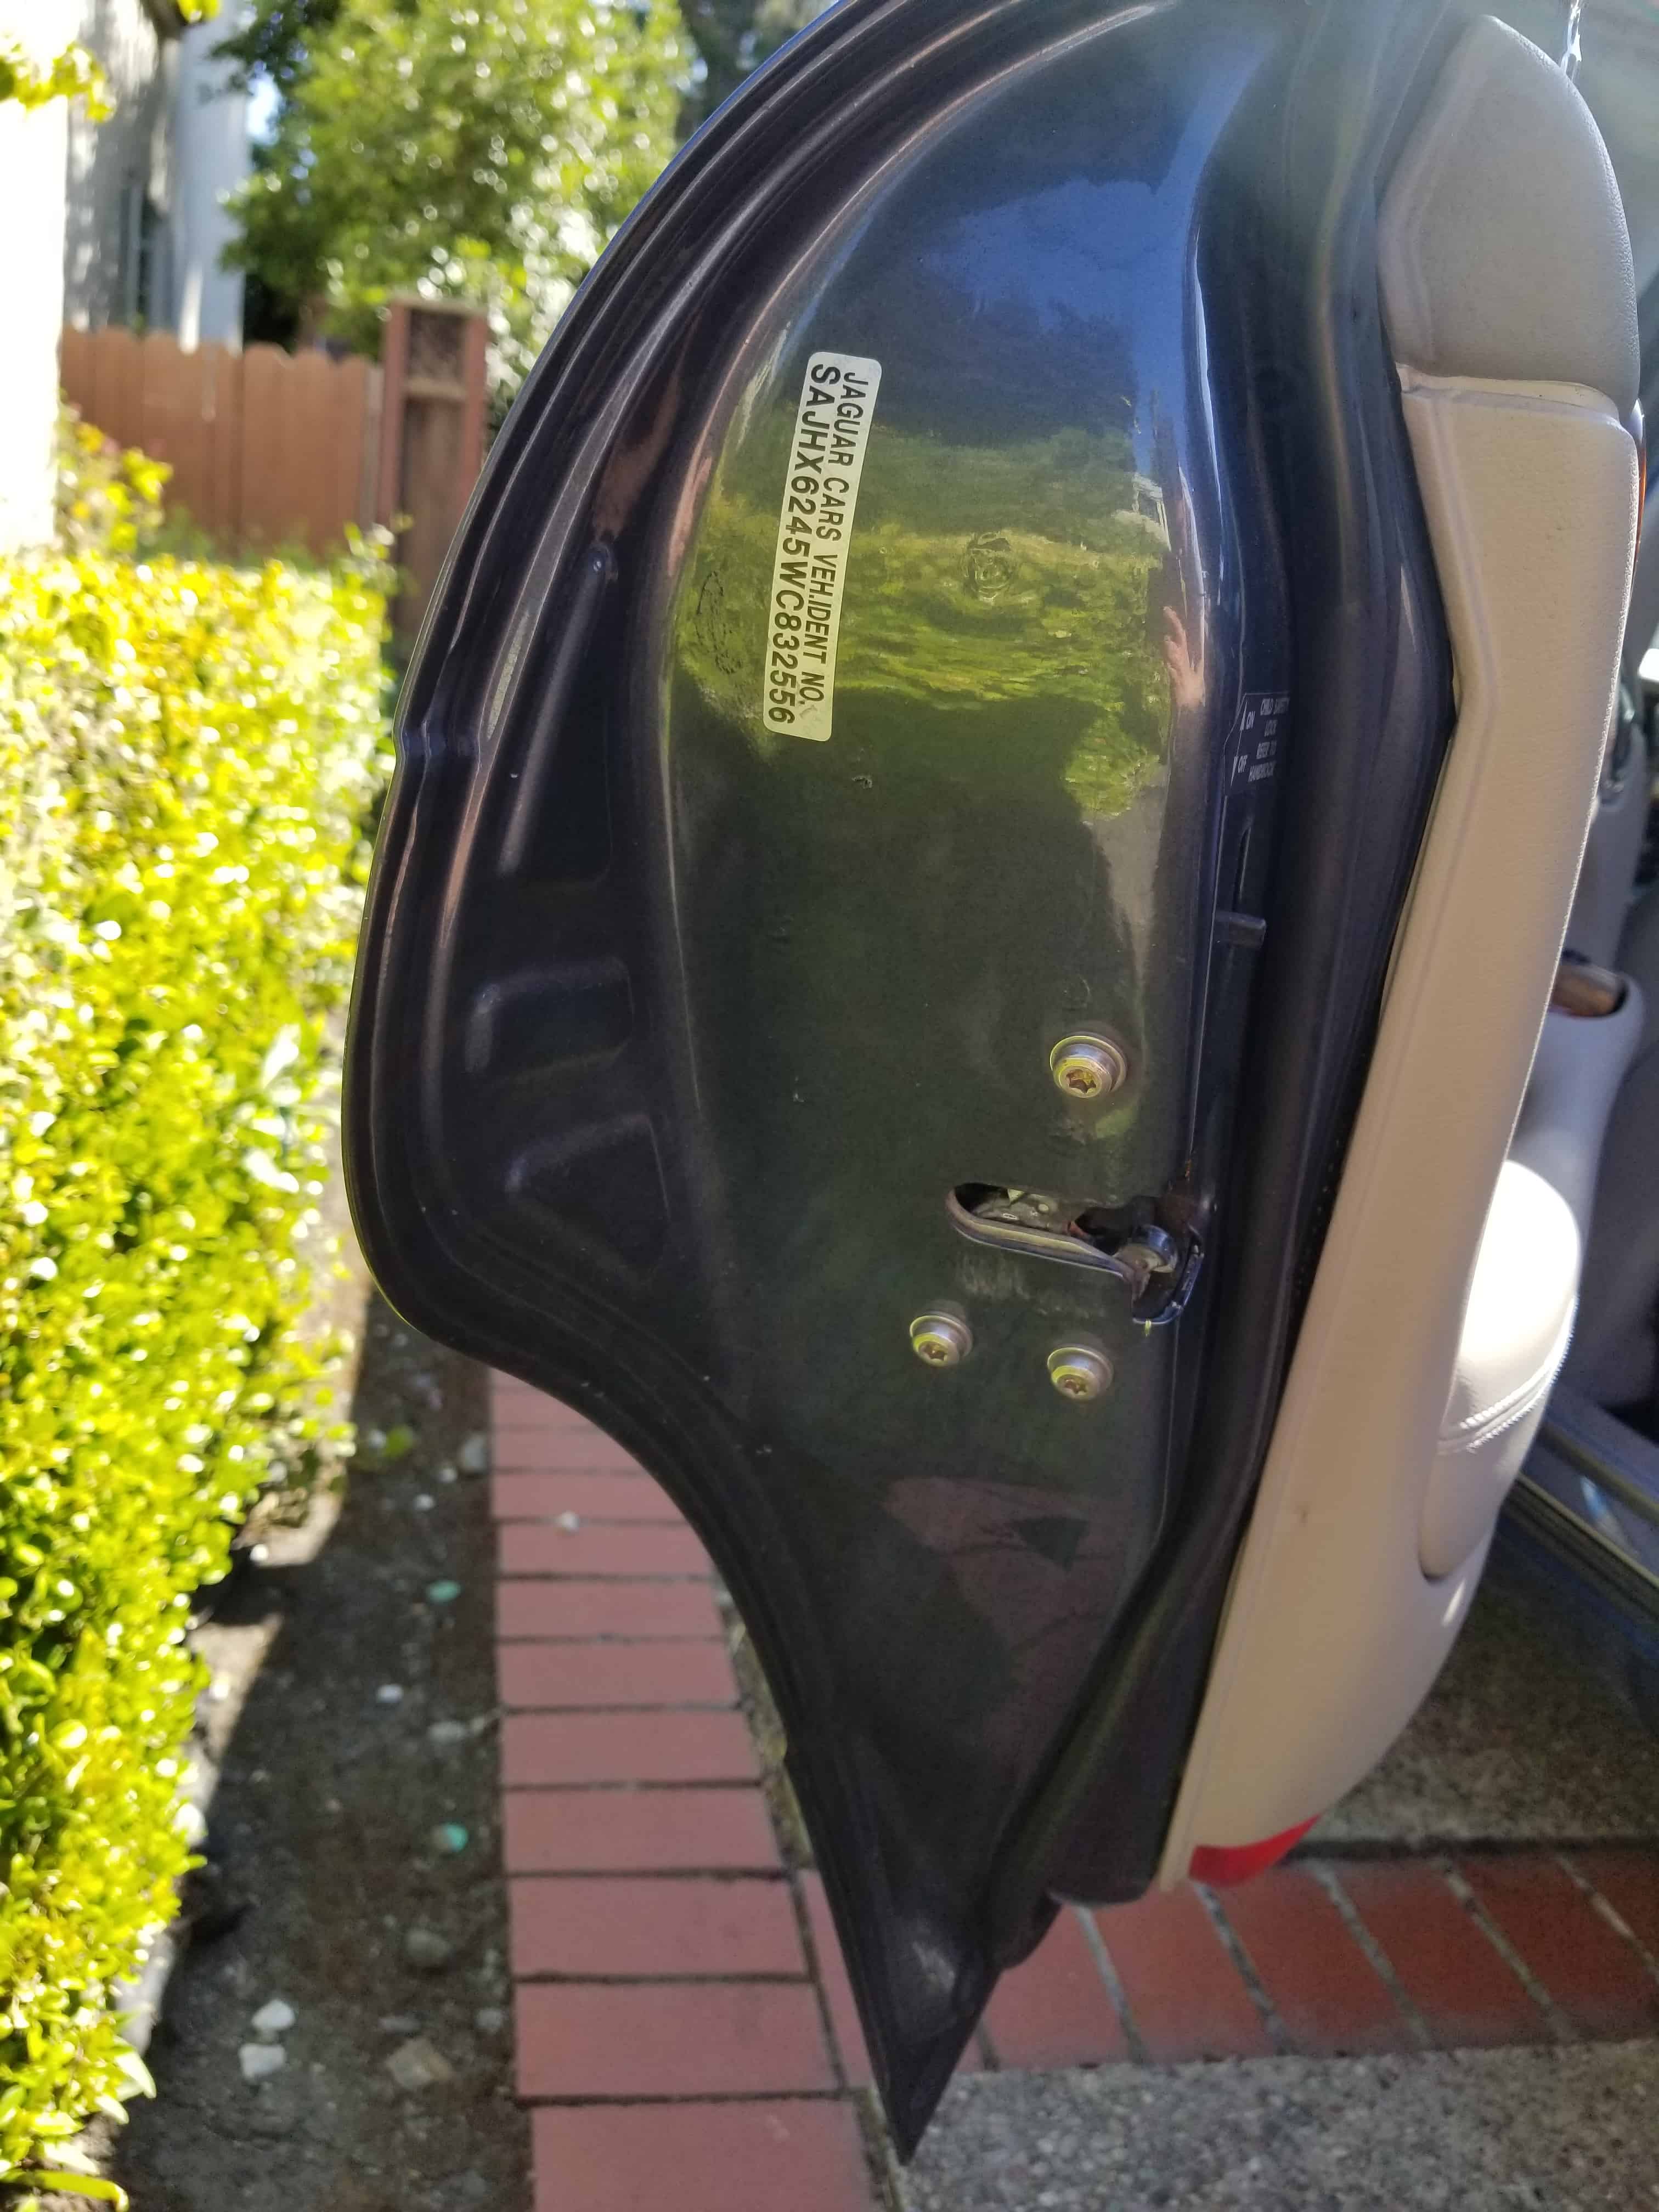
Opening the rest of the doors, including the trunk, revealed a VIN sticker on every panel. This doesn’t mean the other panels didn’t receive paintwork – it just means they are the original panels to the car. Further inspection revealed both passenger doors were painted, as well as the fender.
FACTORY MARKINGS, SPOT WELDS, AND RIVETS
When body shops replace entire panels on certain cars, they may face the need to weld or replace rivets. A body shop typically won’t go through the hassle of duplicating the factory spot welds for the sake of an insurance repair, especially if it’s an older car and there are more modern ways of attaching a panel. This is all fine and dandy at the time of repair, but it leaves evidence that the panel has been replaced.
You don’t have to be an expert to spot original welds – simply look on the other side of the car. If the welds or rivets look different on the other side, this is confirmation that at least one of the panels has been replaced. You can then inspect the panels in question and look for additional signs of repaint.
Two examples we can refer to are the W113 generation Mercedes SL and the G series Porsche 911. Lets start with the Benz:
These are factory spot welds located along the front fender (engine bay side) of an early 280 SL. In order to removal a panel on these cars (pre-1971), you need an air chisel. There are no bolts holding in any of the panels.

Here is a shot pulled from the Pagoda SL Group forum. The driver’s side has clearly been worked on. The welds aren’t clear (probably due to a thick layer of paint over them) and the paint is chipping in a way that factory paint will never chip. The paint chips alone are a red flag, and the spot welds in this picture confirm that the panel has been removed.
Air cooled Porsche 911’s will provide their own unique clues (I use the G series as I’ve probably inspected more of these than any other car while in the field). For example, the underside of these cars came coated with a special rubberized PVC coating from the factory that extended to the inside of the wheel wells, including the wheel arch lip of all four wheel arches. You sometimes see enthusiasts rubbing their finger along the inside of the arch during a pre-purchase inspection, and it’s because they are looking for this bumpy texture. The factory coating is not reproduced, and experienced hands know what the factory texture feels like (vs a refinished job). The only reason the original texture would be absent is because the whole panel was replaced entirely (replacement panels don’t have this coating) or its been rubbed off, filled in, or re-coated as a result of paintwork – possibly due to an accident.
These are the types of things to take note of when inspecting an unmolested, original example. It’s worth the time of taking photos and brushing over it with a fine tooth comb, especially when the car in question is commanding a high dollar figure. Take the time to research the appropriate forums for guidance. If you are about to spend big money on a collector grade, low mileage vehicle – give yourself the peace of mind!
WHAT ABOUT USING A PAINT THICKNESS GAUGE?
NOC has a separate article on using a paint thickness gauge to spot paintwork. If you find yourself inspecting vehicles on a regular basis (whether for a living or hobby), or if you detail cars frequently, it may be worthwhile to invest in a paint thickness gauge. Most people don’t, however, and you’ll find that most of the time you won’t need one if you know what to look for.
OK, SO THE CAR I’M INSPECTING DOESN’T RETAIN ALL OF IT’S ORIGINAL PAINT. SO WHAT?
In reality, it’s very rare for old cars to retain all of their original paint. To drive a car for twenty or thirty years without a hiccup is quite a task, especially since you have no control of incompetent drivers on the road. A clean car is a clean car – just be aware of the value that original paint brings, and make sure you know how to protect and maintain it for years to come.
Just know that when you come across a car that retains all of it’s original paint (in good condition), realize how difficult it is to avoid paint damage for 20 or 30 years straight, especially when the owner drives it on a regular basis. This is why collectors pay a premium for these cars!
This concludes the guide, and as always, I encourage comments and tips in the section below. I appreciate your support in educating car enthusiasts and collectors around the globe!

Author:
Andre Clemente, Founder of New Old Cars, LLC ©
Article Last Updated: July 6, 2020
About the Author: Andre Clemente, a member of the Society of Automotive Historians (SAH), has spent over 12 years in the business of buying and selling cars – half of those years were dedicated to the classic car/sports car business. As an automotive paint fanatic, Andre has been hyper-focused on learning paint correction and inspecting automotive paintwork, working alongside veteran dealers, brokers, and a licensed Concours judge in the process. Years of real-world practice and application gave him the experience to identify inaccuracies and myths that are widely accepted when authenticating a vehicle’s paint job. Rather than keep his knowledge as a trade secret, he has decided to share the research and insider details he’s learned to help educate the collector car community, and ultimately shine a brighter light on the cars truly wearing their original paint.
Other articles you may enjoy:
Orange Peel: Why Your New Car’s Paint May Look So Bad
The True Value of Original Paint
Those Paint Defects Most Likely Aren’t From The Factory
What A Paint Thickness Gauge Really Tells You
Why Are Bumpers a Different Shade from The Rest of The Car?
…and more, in the Tech section!